How to use the Apple Intercom Feature on HomePod or HomePod mini

Your HomePod doesn’t just play great music. It can also act as a home intercom.
If you own at least one HomePod or HomePod mini, you can now access the new Apple intercom feature that works with iPhone, iPad, iPod touch, Apple Watch, and CarPlay. The feature lets you send real-time voice messages to others through compatible devices with ease. Here’s how to do it.
Apple Intercom: What You Need
To use the intercom, you need to update your HomePod or HomePod mini to the latest software. Your iPhone, iPad, iPod touch, or Apple Watch must also be using the latest software. The Apple intercom is turned on by default with the software updates.
Note: To use Intercom, your iOS device needs iOS 14.2 or later, your iPadOS devices need iPadOS 14.2 or later, or your Apple Watch needs watchOS 7.2 or later.
Updating the Speakers
The check for software updates for your HomePod or HomePod mini speakers:
- Update iOS or iPadOS on your mobile device.
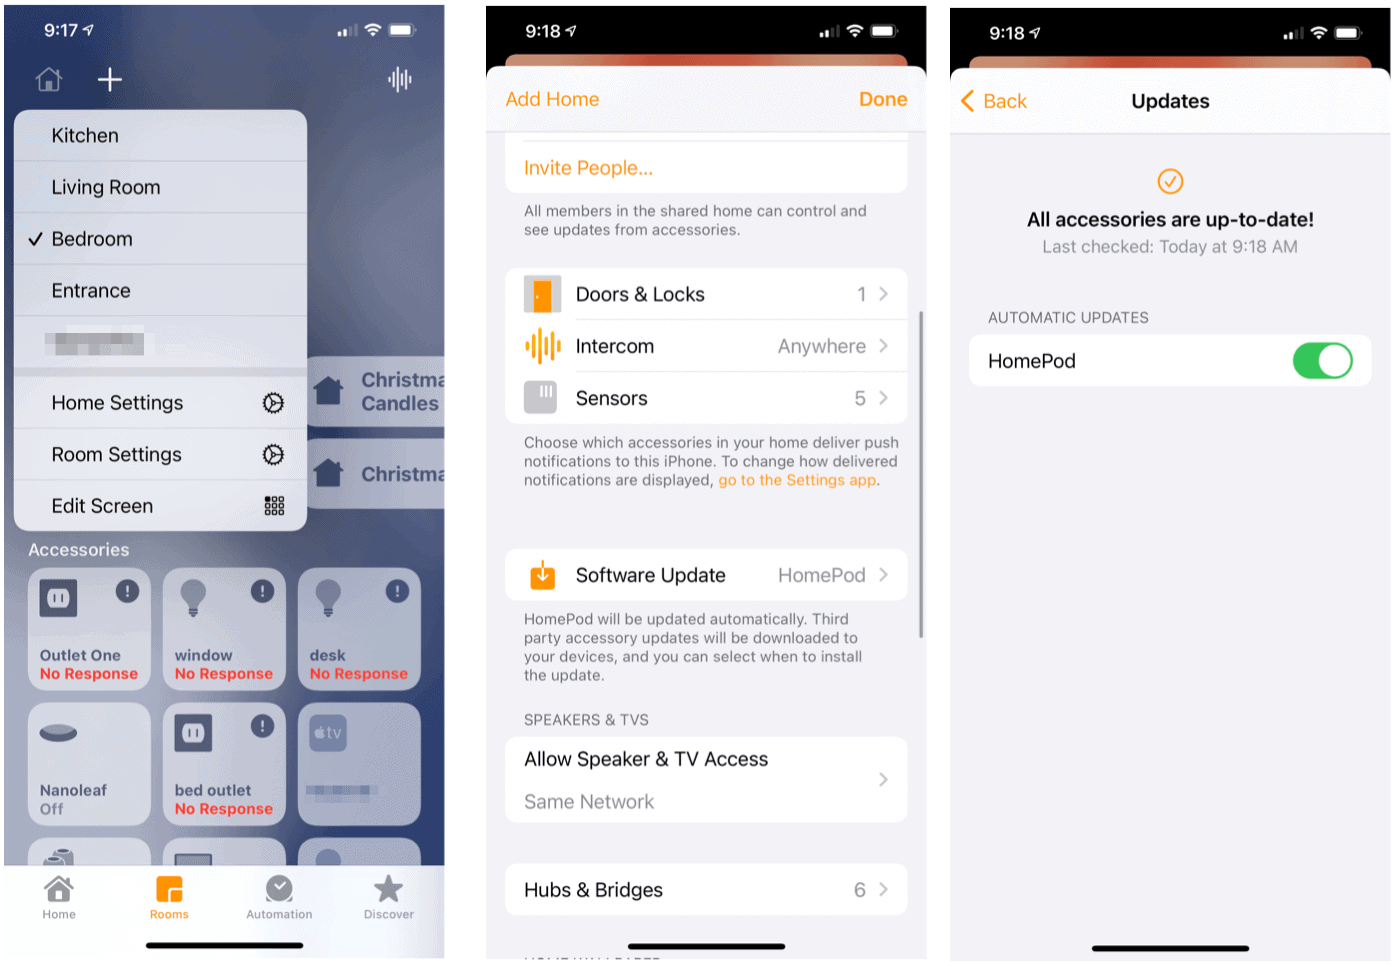
- Open the Home app on your device.
- Tap the Home icon at the top left.
- Choose Home Settings.
- Select Software Update. Follow the on-screen directions to update the software, if applicable.
Setting Up Apple Intercom
You can adjust which devices may receive intercom notifications and which family members have access. You can also choose with HomePod speakers can use the feature.
To make changes:
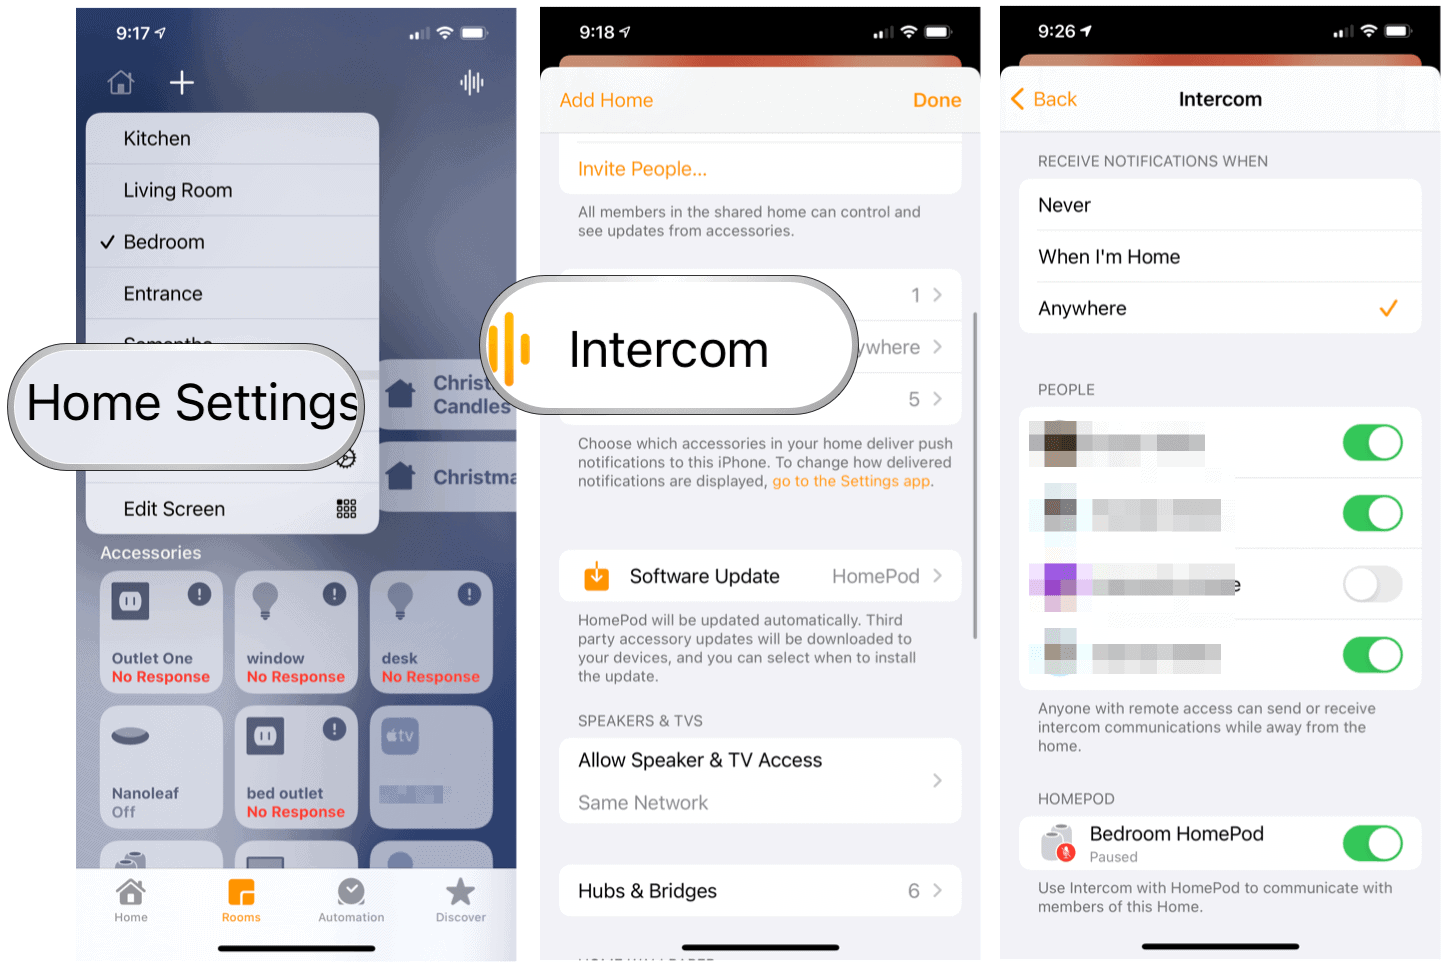
- Open the Home app on your device.
- Tap the Home icon at the top left.
- Select Home Settings.
- Choose Intercom, then make your adjustments. You can set when notifications are sent, who can send/receive them, and which speakers are used.
Using Apple Intercom
Sending an intercom message is possible through Siri or the Home app. You can also send and receive intercom messages with your compatible AirPods or Beats headphones. Messages are sent to every HomePod speaker in your home, and every device with intercom notifications turned on.
Through Siri
To use Siri to send intercom messages through your HomePod, HomePod mini, iPhone, iPad, iPod touch, Apple Watch, AirPods, or CarPlay, say something like:
- “Hey Siri, intercom ‘Time to wake up.'”
- “Hey Siri, ask everyone ‘What’s for dinner?'”
To can also limit intercom messages to a specific room or zone in your home. Zones are a collection of rooms (for example, a floor) that you can set up in the Home app. You must have a HomePod or HomePod mini in the room or zone.
Sample commands include:
- “Hey Siri, announce the second floor ‘The movie is starting.'”
- “Hey Siri, ask the kitchen ‘What’s for breakfast?'”
Through the Home app
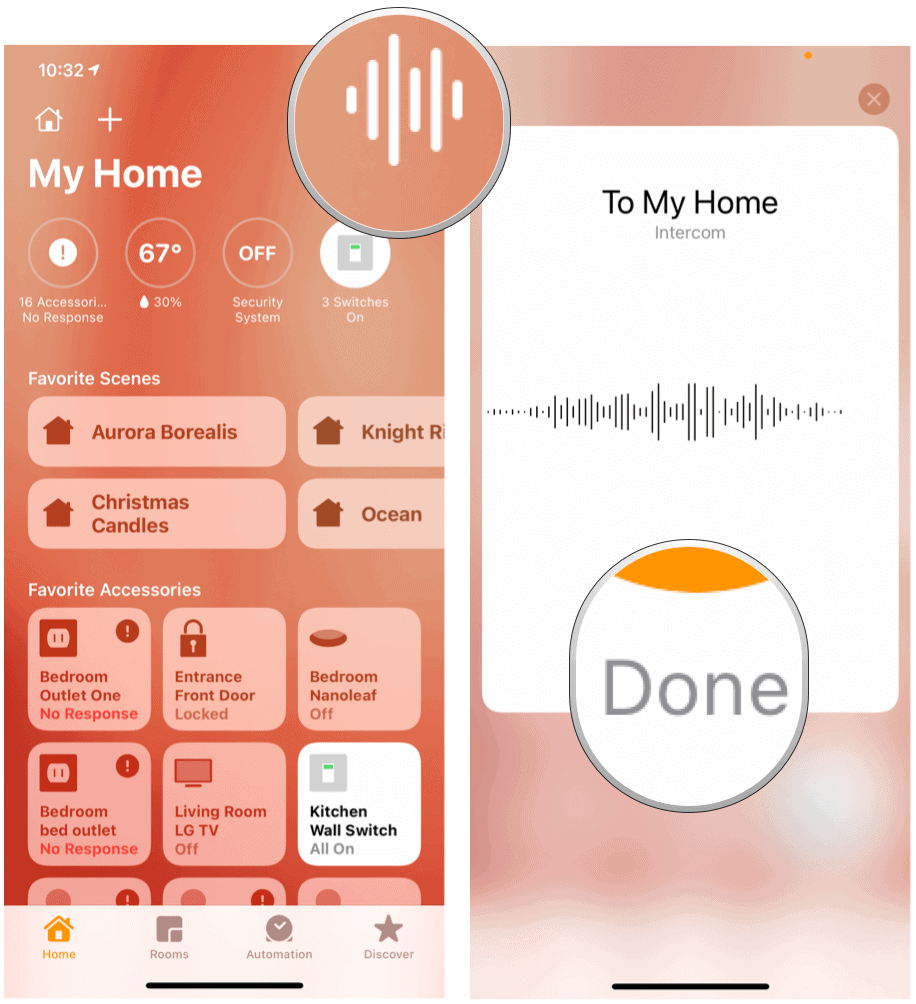
To use the Apple intercom feature through the Home app:
- Open the Home app on your device.
- Tap the intercom icon on the top right of the Home tab.
- Say your message. Messages might include, “Tell everyone the bus is leaving soon,” or “Ask upstairs, ‘Do you have any laundry?”
- Tap Done when finished.
Replying to Intercom Messages
Once you receive an intercom message, of course, you can reply. If the original message went out to your entire home, the reply would go to every HomePod and device in your Home with notifications turned on. If instead, the message was sent to a room or zone, the reply is sent only to the HomePod or device that sent the original message.
For example, you can reply to a message by saying:
- “Hey Siri, reply ‘I’m not interested in watching the movie.'”
- “Hey Siri, reply ‘Cereal is for breakfast.'”
If you want your reply sent only to certain HomePod speakers, you can name them in your reply. Try something like:
- “Hey Siri, reply to the kitchen ‘Which movie are you watching?'”
- “Hey Siri, reply upstairs ‘I’ll be there in 5 minutes.'”
Additional Settings
To customize the Apple intercom experience, you can turn off or limit notifications and disable the intercom.
Adjusting Notifications
Without making changes, all your home members receive intercom notifications on their devices while they’re inside the home. To change the settings:
- Tap the Home app on your device.
- Choose Home Settings.
- Select Intercom.
- Do any of the following:
- Turn off notifications: Tap Never.
- Get notifications only while you’re at home: Tap When I’m Home.
- Always get notifications: Tap Anywhere.
Disabling Intercom
You can disable the Apple intercom for some or all of your HomePod speakers or different members of your home. To do so:
- Tap the Home app on your device.
- Choose Home Settings.
- Select Intercom.
- Do either of the following:
- Disable Intercom for a HomePod: Under HomePod, turn off a HomePod.
- Disable Intercom for a member of your home: Under People, turn off the member of your home who should not send or receive Intercom messages on their iOS, iPadOS, and watchOS devices.
You can turn the intercom back on at any time by reversing the steps.
The Apple intercom feature works best in larger homes where there is more than one HomePod speaker. Regardless, it’s a great tool with a simple set-up. Best of all, you probably have all the necessary tools already in your home.


