How to Use Tasker On Android to Automate Everything

Tasker is one of those apps that you won’t be able to live without once you start using it. Here’s how to control all IoT devices.
Tasker is one of those apps that you won’t be able to live without once you start using it. The app lets you tap into the power of every component of your Android to make full use of everything your Android is capable of doing.
Imagine no longer having to fumble in the dark to turn on your flashlight app. Or no longer running out of battery power because you left Wi-Fi turned on when you didn’t really need it.
Tasker lets you transform your phone into an automated assistant that takes care of the smaller details automatically so that you don’t have to. Let’s take a look at how easy it is to use Tasker to automate your Android phone.
Navigating Tasker
When you first launch Tasker, the app looks deceivingly simple. There are simply four menu items, and if you tap on each of them you’ll see that the screens are currently blank. This is because you don’t have any automated tasks set up yet.
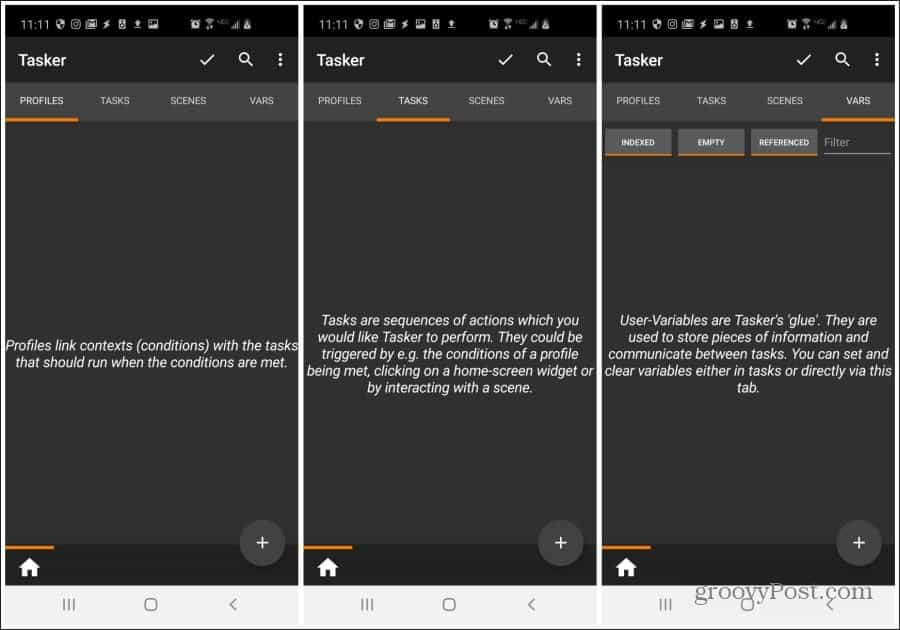
Here is the meaning behind each menu item:
- Profiles: Shows you the conditions that should trigger the tasks that you’ve configured
- Tasks: Sequences of actions that Tasker will perform when the right conditions are met
- Scenes: User interfaces you’ve designed as a front-end to your Tasker automations
- Vars: Variables you can create to pass information between tasks
Most Tasker users never even touch Scenes and Vars. Some more advanced users might start using variables within task automation. But unless you’re looking to create your own app, you’ll probably never have the need to use Scenes.
Let’s get started with putting together some of the more useful task automations in Tasker
Enable All Permissions
To control your Android, Tasker needs permissions to do things like change settings, creating notifications or using administrative commands.
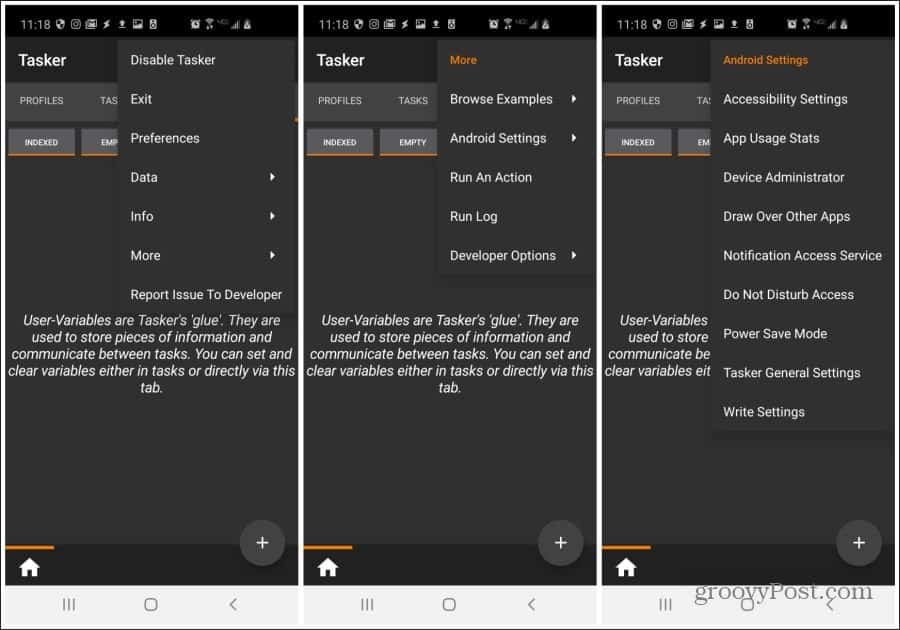
To do this, from the main Tasker screen select the three dots to the upper right. Select More. Select Android Settings. Then go through each menu item and enable authorization for Tasker for each of them.
Create a Night Mode Task
Starting off with an automated task that everyone needs, let’s look at automating all of the things you normally do with your phone when you go to bed.
These might include:
- Enable Do Not Disturb
- Launch Clock app
- Play a soothing music track
Set Up A Profile
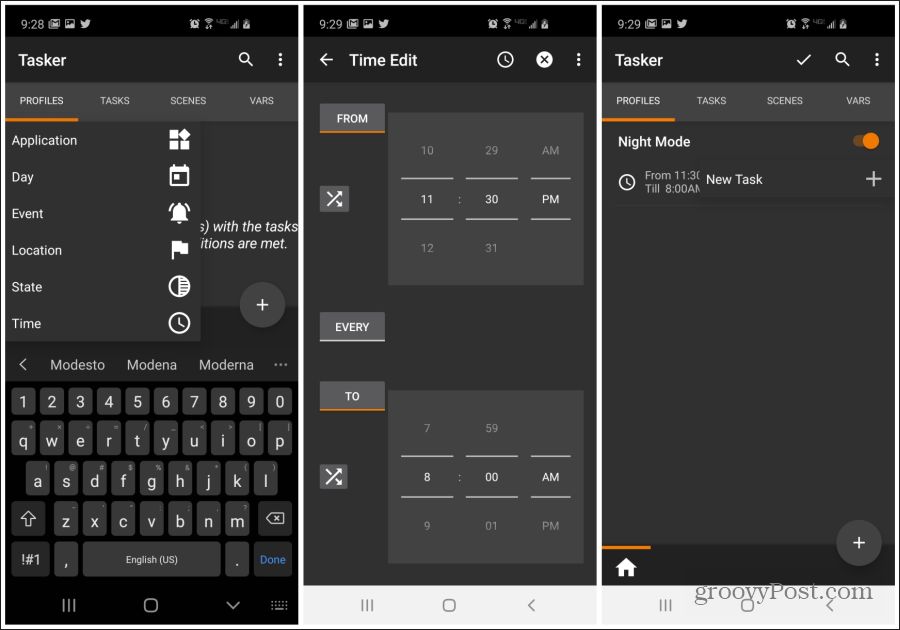
To set these up, make sure you’re on the Profiles menu.
- Tap the + icon at the lower right corner of the screen. Name the profile Night Mode.
- Select Time from the pop-up menu.
- Set the FROM time to when you go to bed, and set the TO time to when you wake up.
Create Do Not Disturb Task
Now that your profile is created, you need to create the task that enables Do Not Disturb mode.
- Give the task sequence the name Do Not Disturb and select the checkmark.
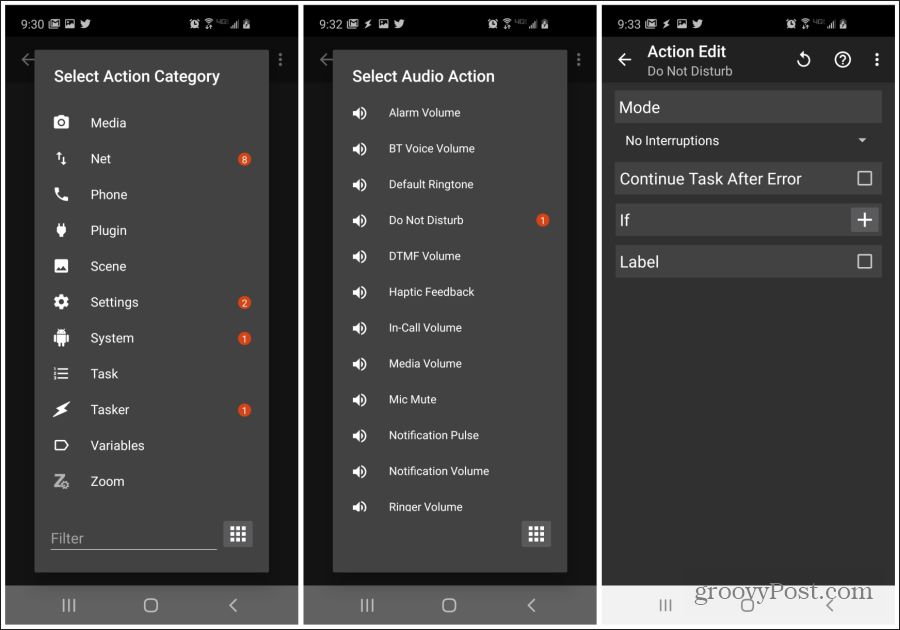
- Select Audio from the action category and then select Do Not Disturb.
- Make sure Mode is set to No Interruptions and select the back arrow at the top of the screen.
Create a Clock App Launch Task
Next, you need to create the task to launch the Clock app.
- Back on the Task Edit screen, select the + icon at the lower right corner of the screen.
- Choose Launch App from the menu and then select the Clock app (or any app you use to manage your morning alarm).
- Press the back arrow and now you’ll see both tasks listed on the Task Edit screen.

- On the Task Edit screen, select the + icon at the lower right corner of the screen.
- Select Music Play from the menu.
- Browse to the directory where your sleep music track is located and select the music file.
- Press the back arrow and now you’ll see all three automated Night Mode tasks listed in the Task Edit screen.

Under the Profiles menu, you’ll now see the time trigger you’ve set and the Do Not Disturb task sequence you created. Every evening when you go to bed at your scheduled time, these three tasks will run in sequence automatically.
Create a Morning Exit Task
To create any task sequence that is the opposite of a previous sequence you created, you can create what’s called an “Exit Task”. Creating this is very simple.
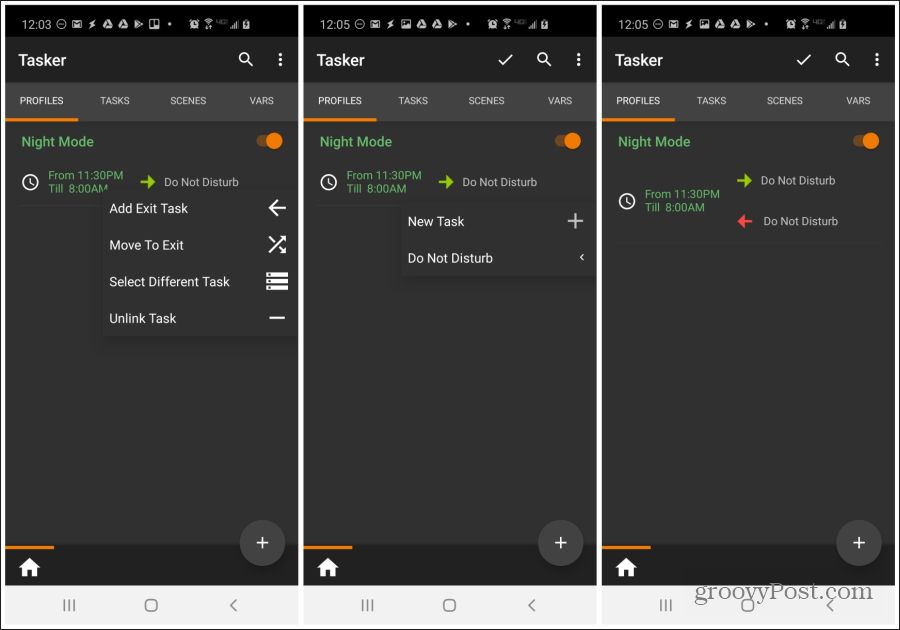
- Long press on the Night Mode profile you just created.
- Select Add Exit Task.
- Tap the name of the original task sequence you created. In this case that’s Do Not Disturb.
Now you’ll see a red arrow pointing left in the profile signifying that when the conditions of the profile are no longer met (after 8:00 AM), all tasks you defined for that profile will be set back to their original settings. It’s as simple as that!
Adjust Brightness Based On Time Of Day
One annoying thing about mobile phone screens is that the display never seems to be at the right brightness setting. The screen may be too bright in a dark room at night and hurt your eyes. Or, it may be too dim outdoors during the day and you can’t see anything.
Tasker provides an easy solution: Screen brightness adjustment based on the time of day.
To do this, follow steps 1 through 3 in the first section above to create a Profile that’s triggered during evening hours, maybe from 7 pm through 6 am. Then, follow the steps below to lower screen brightness during those hours.
- On the Profile screen, to the right of the new profile, select New Task.
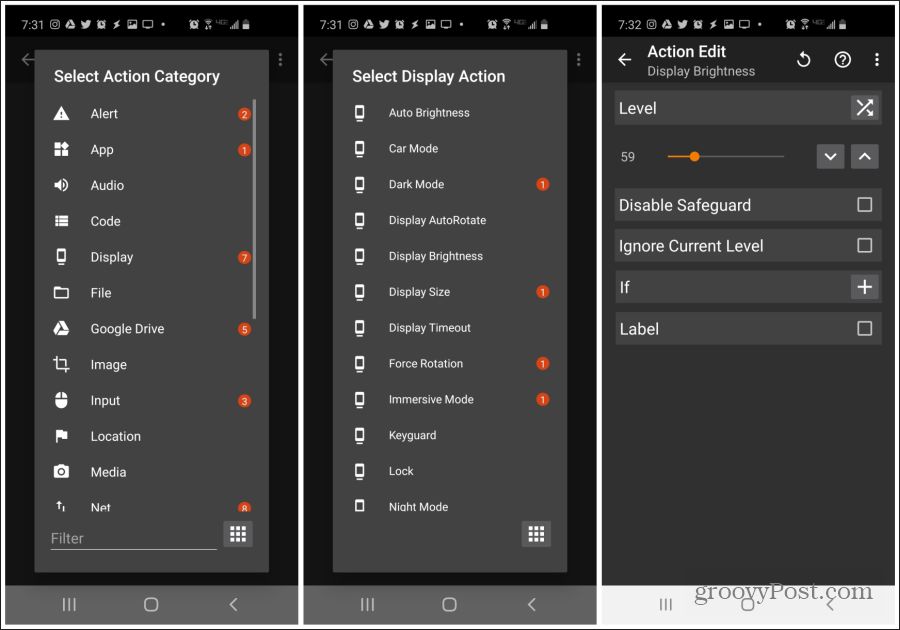
- Name the task and then select the + icon at the lower right. Select Display from the Action list.
- From the Display Action list, select Display Brightness.
- Lower the brightness level using the slider. Press the back arrow when you’re done. Press the back arrow on the Task Edit screen to finish.
Now you need to create an Exit Task for daytime brightness.
- Back on the Profile screen, long-press the new profile and select Add Exit Task.
- Select Night Brightness.
Now during nighttime hours, your lower display brightness setting will take effect. Outside of those evening hours, the phone will revert back to the original (higher) brightness settings.
Turn Wi-Fi Off and GPS On When Leaving Home
No matter how good mobile battery technology gets, Wi-Fi consistently drains the battery faster when they’re left turned on. You also usually need GPS to navigate when leaving home.
One way to automate the nuisance of constantly turning those off or on when you don’t need them is to use Tasker to automate that action. You can do this by triggering those whenever you leave home.
Here’s how you do this in Tasker.
- In the Profile screen, tap the + icon at the lower right corner of the screen. Name the profile Away From Home.
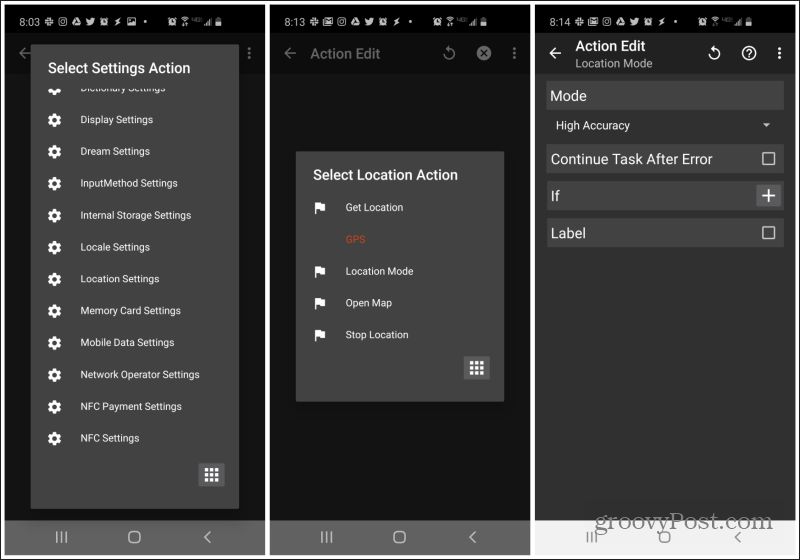
- Select Location from the pop-up menu.
- On the Location Edit screen, zoom in to your location and long-press to mark the location. Select the back arrow when you’re done.
- Name the location Home and tap the checkmark. Select New Task.

Next, create the GPS task.
- Name the task Sensor Settings and tap the checkmark.
- Press + in the lower right corner, select Location from the action category, and then select Location Mode. Make sure High Accuracy is selected. Select the back arrow to finish.
Finally, create the WiFi task
- Press + in the lower right corner, select Net from the action category, and then select WiFi. Make sure Off is selected under Set. Select the back arrow to finish.
- Select the back arrow on the Task Edit screen to finish.

You’ll also want to create two Exit Tasks to disable GPS and enable WiFi when you get home.
To do this:
- Long press the profile you just created and select Add Exit Task.
- Select Sensor Settings.
That’s all there is to it. Now those two settings will revert back to normal whenever you arrive home!
Note: How does your phone know you’ve left home if GPS is off when you’re home? Note that both GPS and NET were enabled in the map view. This is because Tasker uses both your network location as well as GPS location to determine the location of your phone.
Now that you know how to create profiles and tasks, the following sections will provide just the settings to look for to create these automations.
Warn Someone Your Battery Is About to Die
This automation will send someone you text often a message telling them that your phone battery is about to die. This way they won’t worry about not hearing back from you.
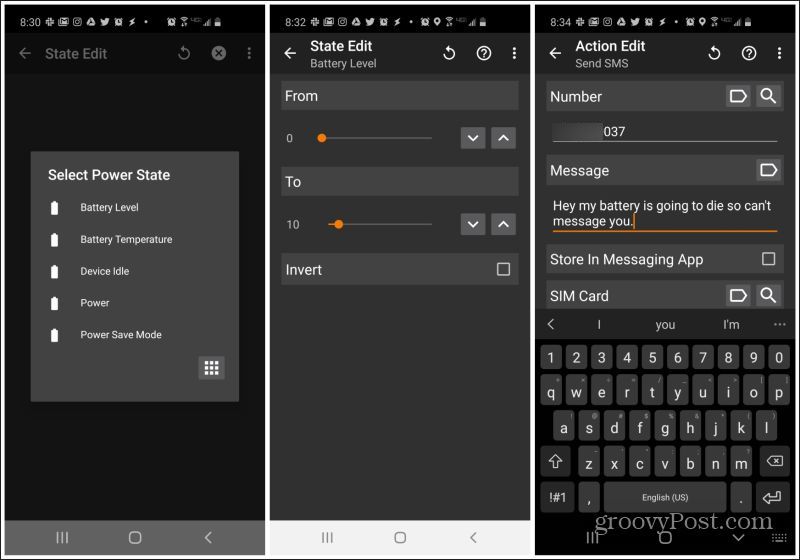
- When you set the Profile trigger, select State, Power, Battery Level, and set the range from 0 to 10 percent.
- Adding a new task, select Phone, Send SMS, then type the phone number and the message.
There is no need to set an Exit Task unless you want to send another message when your battery is charged.
Prepare Your Phone For The Gym
What do you do with your phone every time you get to the gym? Turn on Bluetooth to pair your earbuds, turn on Wi-Fi to use the gym’s Wi-Fi network, and launch Spotify to play your tunes.
Why not let Tasker do all of that for you automatically?

- When you set the Profile trigger, select Location, New Location, and pick your gym location on the map.
- Create a new task, select Net, Bluetooth, then select On under Set.
- Add a new task, select Net, WiFi, then select On under Set.
- Again, add a new task, select App, Launch App, and select Spotify from the apps list.
All three actions will trigger whenever you arrive at the gym.
Place Your Phone Face Down To Silence It
This automation is a favorite for many Tasker users. In a meeting and don’t want to get interrupted? Just put your phone on the table face down.

To enable this automation:
- When you set the Profile trigger, select State, Sensor, Orientation, and select Face Down under Is.
- Add a new task, select Audio, Vibrate Mode, then select Vibrate under Mode.
This is an easy one to set up but invaluable when you need to quickly silence your phone.
Shake Your Phone To Turn On The Flashlight
When you’re in a dark room, the last thing you want to have to do is fumble with your phone to get some light. This Tasker automation lets you just shake your phone to enable the flashlight app.
To set this one up:
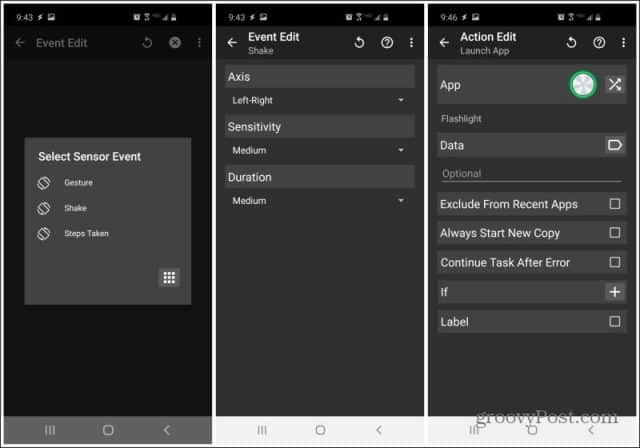
- When you set the Profile trigger, select Event, Sensor, and select Shake. Adjust Axis and Sensitivity to whatever you prefer.
- Add a new task, select App, Launch App, then select your preferred flashlight app.
Now just shake your phone any time you need to light up the dark!