How To Use Multiple Signatures in Gmail

The ability to use multiple signatures in Gmail should be a very useful addition to the service for many users. Here’s how.
Multiple signatures in Gmail are a necessary feature, which has been a very long time in the making. It’s finally here, so let’s see how to use it.
How to Use Multiple Signatures in Gmail
If you’re short on time, here’s what you’ll need to do to use multiple signatures in Gmail:
- Open Gmail and press the Settings icon in the top right.
- From the pop-up menu, press See all settings.
- In the General tab, scroll down to the Signature section.
- Press the Create new button in the Signature section.
- Add a new signature name, then press Create.
- In the text box provided, create your new email signature and format it accordingly.
- Press Save changes at the bottom to confirm.
- To switch between signatures, press Compose, then press the Insert Signature button in the bottom menu bar.
- From the pop-up menu, select the signature you wish to add to add it to your email message.
If a message is already inserted, you’ll need to delete it first manually before you insert another one.
Multiple Signatures
A lot of people use Gmail in various professional capacities. You could be an engineer that moonlights as a freelance designer, using Gmail for both of them. If that is the case, you wouldn’t be using the same signature, would you?
Until recently, Gmail would only allow you to have preset signatures if you had different accounts set in it. That is not the case anymore. As many signatures as you like can be used now, allowing much more flexibility. If you want to have one signature for personal emails and one for job applications, there’s nothing getting in the way of that. Let’s see exactly how.
Creating and Using Gmail Signatures
Like most things Gmail, this is quite easy to do, Just make sure you’re logged in to your Gmail account beforehand.
Then, from your Inbox, click the Settings button — you’ll find it at the top right side of your screen. In the menu that pops up, click Settings (again).

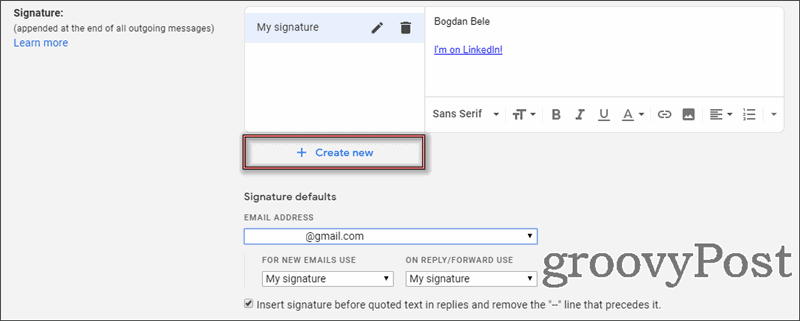
A page will open where you can alter a lot of Gmail’s visual and functional parameters. Scroll down until you find the Signature block, shown in the image below.
The signature you can edit is the default (or current) one. Since you want to create a new one, click Create new. You will need to give your signature a name.
Feel free to get as creative as you want with it. There are a lot of font options, or you could add a link if you want to. For some reason, numbered lists are available as well (in case you want to put your Amazon wishlist in there).

Now that you’ve created your signature, don’t forget to set when you want Gmail to default to it. You will find this under the editing area.

Whatever you decide to do, don’t forget to scroll to the bottom of the screen and click the Save button when you’re happy with your creation.
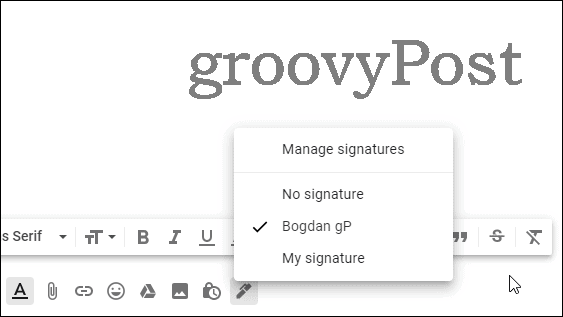
Now that you have created your new signature, you can also select between the ones you have available. Whenever you’re in a Compose or Reply window, you have a dedicated button that allows you to do this.
The ability to use multiple signatures in Gmail should be a very useful addition to the service for many users, as they won’t have to keep editing it every time they need to send an email in a different capacity.