How to Start Facebook Live Streaming and Not Mess It Up

The future of the Internet and social media is video. In particular, live streaming video. Here’s how to start Facebook Live streaming and not mess it up.
The future of the Internet, and social media, in particular, is video. In particular, live streaming video. This explains the skyrocketing popularity of Facebook Live, YouTube Live, and Instagram TV. People like spontaneity and realism. So, since I have books to sell and a streak of sadism running through me, I decided to start Facebook Live streaming. Oh boy, was that ever an experience!
My first attempt flopped when I discovered later that the audio had malfunctioned. So the title of this article is a bit ironic since I did mess it up. But hey, I fell flat on my face, so you don’t have to. You’re welcome.
Start Facebook Live Streaming & Be an Online Star
Facebook Live streaming is the same as a live TV show. You appear on an online video screen, and you start talking to your followers. While you are broadcasting, you can see who is coming online, and they can send you messages in the comments section—kind of like a radio phone-in show.
And since the stream is live, there is no possibility to edit the show, so everything is spontaneous. The potential for a massive embarrassing calamity is there, but so is the potential to connect with your audience. Having successfully redone the first failed stream, I realized I hugely enjoyed the process.
But before I started, I was extremely nervous. I was sweating, and I suddenly realized what stage fright felt like. People were out there waiting for me to appear. What if my brain shut down and I didn’t know what to say? But I quickly realized that it was easier with a rough script outline and a few Hail Mary’s than I thought.

Go to the Page Where You Want to Do Your Live Video
Facebook Live streaming can be done on your profile, a page, or a group. Go to the page where you want to launch your broadcast, and in the status update box, you will see an option for “Live video.”

You will now be taken into the live streaming area, where you will be asked to grant Facebook permission to your webcam camera and microphone.

It is worth investing in a good microphone if you intend to do this regularly. I have the Blue Yeti microphone, and it was worth every cent.
Your face will now pop up on the screen, and there are options you now need to decide on.

Stream Now or Schedule for Later?
Facebook Live gives you two options — begin your stream immediately or schedule it for a future date.
There are advantages to both. Streaming immediately is more spontaneous, but scheduling in advance gives you the chance to advertise the show and make sure people turn up to watch it. There’s nothing more embarrassing than starting a show in an empty room. Just ask any newbie standup comedian on their first night.
When your face appears on the screen, you will see two options at the top: Camera and Connect. To schedule your show in advance, you need to use the Connect option. But since that’s the option with the most hoops to jump through, let’s look at starting the show immediately.
Streaming Now
On the Camera tab, look to the right of the screen, and you will see some details that need filling out. It’s nothing complicated. Specify which page you want the stream to appear on, add a title and description, then at the bottom of the screen, click “Go Live.”
There will then be a countdown from three on the screen, and you will be on.

Once you are finished, click the button to end the stream, and you will be told you are off the air. The show will then be saved and placed on your page for people to watch again. You can also find it in the Videos section of your page to download it — which I did for my YouTube page.

Scheduling for Later
Now, let’s look at the process of scheduling your stream for later.

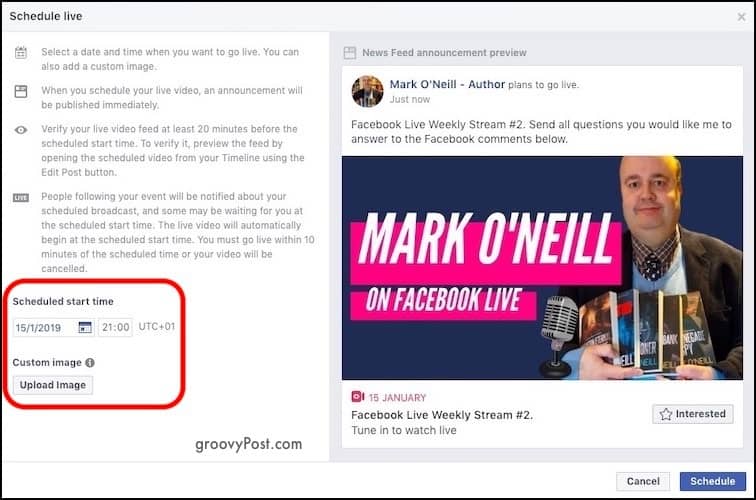
You will immediately be faced with lots of technical jargon and options on the Connect tab. But you can honestly ignore all of that. Just look to the right again, and you will see the same options as the Camera tab. The only difference is that you will also see a Schedule button at the bottom of the screen.

After choosing the stream page and adding the title and description, click the Schedule button. You will then be asked to specify a date and time in the future and the option to upload a custom image. I made one in five minutes on Canva.
When the time to do your show, go back to the same video screen and ensure your camera is on. The camera will kick in when the time comes, and your show will start.
How Did it Work Out?
See for yourself. This is how my second attempt went:
Have you done Facebook Live streaming? If so, how did your first one do? A huge success or a huge mess? And if you have had some success and have any tips, please let us know!