How to Open Ports in Linux

If you’re looking to allow outside connections to a PC or server, you’ll need to open the right port. Linux users can open ports using this helpful guide.
Need to connect to an outside PC or server—or need another PC or server to connect to you? If you’re running Linux, you’ll need to make sure the right port is open.
While other operating systems usually have some graphical tool for this, Linux isn’t so simple. We’ll walk you through how to open ports in Linux below.
What is a Port and Why Would I Need to Open It?
A port is an end point on the network. Think of it like a door that leads to a particular room or the outside world, but on your computer. Everything you do on the internet uses a particular port or series of ports.
For example, let’s say you want to run your own Minecraft server. To do so, you’ll need to open a port for users to connect to it through. The same would apply to running your own web, mail, or FTP server.
Ports are standardized across all network-connected devices. The first 1,024 ports (from 0 to 1023) are referred to as well-known port numbers. They are reserved for the most commonly used services, such as HTTP and HTTP (port 80 and 443, respectively) and SSH (port 22).
Port numbers above 1024 are referred to as ephemeral ports, and are typically available for you to use for your online gaming, private web servers, and so forth. Port numbers 1024 to 49151 are called registered or user ports, while those from 49152 to 65535 are known as dynamic or private ports.
Listing Open Ports on Linux
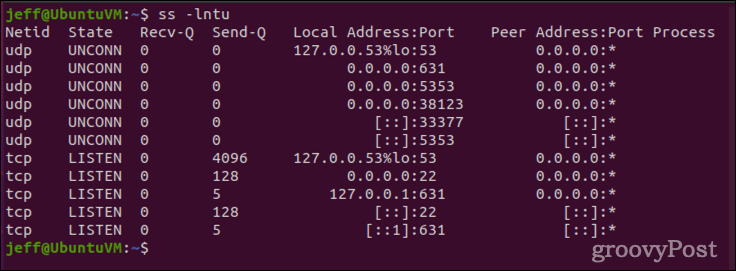
Before you start trying to open a port on Linux, you should make sure it isn’t already in use. You can accomplish this using the netstat command, included on most Linux distributions. If your distribution doesn’t have netstat, you can use ss instead.
netstat -lntu
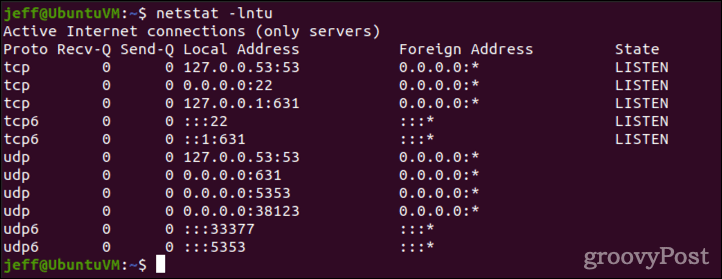
This will print all listening sockets (-l), along with the port number (-n). It includes TCP ports (-t) as well as UDP (-u). If your system doesn’t have netstat, just use ss with the same parameters.
ss -lntu
How to Open Ports in Linux
For the sake of this example, we’ll assume we want to open port 4000 to TCP connections. We first need to make sure the port isn’t already in use. We do this through netstat or ss.
netstat -na | grep :4000
ss -na | grep :4000
Assuming the output is blank, we can add the appropriate port rules to the system’s firewall. Methods for this will vary depending on your distribution and whether it uses the newer ufw firewall or firewalld. Ubuntu favors ufw, while CentOS typically uses firewalld instead. Of course, there are still some Linux distributions using the older iptables firewall.
For Ubuntu Users and Other ufw Firewall-Based Systems
Rather than using the older iptables firewall, Ubuntu and some other distributions use ufw. Under these systems, the following command will open the port.
sudo ufw allow 4000
Skip past the next few steps, and test your newly-opened port to make sure it’s working.
How to Open Ports in Linux Using CentOS and Other firewalld-based Systems
If your system uses firewalld, your best bet is to use the firewall-cmd command to update the rules.
sudo firewall-cmd --add-port=4000/tcp
This won’t be a permanent change, but we’ll cover how to make the rules persist after rebooting once we test the port.
For Other Linux Distributions
If your Linux system doesn’t have ufw or firewalld, you’ll need to use iptables. If it’s not installed, go ahead and get it using your package manager of choice. Once it’s installed, this commands will open port 4000:
sudo iptables -A INPUT -p tcp --dport 4000 -j ACCEPT
sudo service iptables restart
If your system uses systemctl, replace the second command with:
sudo systemctl restart iptables
Testing Newly Opened Ports for Connections
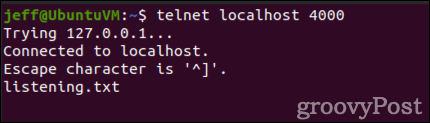
Next, we should test the port to make sure it accepts connections. We do this by using netcat (nc) to listen to the port, then attempting to telnet to it.
First, open a terminal window and issue this command:
sudo ls | nc -l -p 4000
Leave it running (listening) and open a second terminal window. In that window, you’ll use telnet to test connectivity. If telnet isn’t installed, do so using your package manager.
telnet [hostname/IP address] [port number]
Replace [hostname/IP address] with your system’s IP address, and [port number] with the port number you opened.
telnet localhost 4000
You should see output like that below, indicating an open connection with nc.
We can also show the port is open using nmap. Again, if the command isn’t installed already, use your package manager to retrieve it.
nmap localhost -p 4000
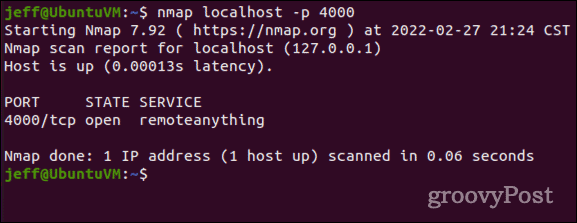
Note that nmap will only list open ports that are listening for connections. That’s why we use netcat for testing, to listen on that port. Otherwise, the port won’t register as being open.
I Can’t Connect to the Port I Just Opened, Now What?
If you run through all of the steps above and can’t achieve a connection to the port, double-check your typing. If you’re certain you entered everything correctly, chances are you’ll need to reconfigure your network router to allow the traffic.
Since every network router has different configuration screens, you should consult the support pages or user’s manual for your particular equipment. You’ll need to check for port forwarding or port mapping settings, as well as any built-in firewall the router may use.
How to Permanently Open a Port in Linux
Once you’ve tested your open port and made sure it’s working, you’ll probably want to make the change permanent. Otherwise, the changes may not stick around after a reboot. If you’re an Ubuntu user, or otherwise use the ufw firewall, you don’t have to worry about this. The ufw rules don’t reset on reboot.
For firewalld Users
Making a port rule stick around after a reboot is easy with firewalld. Just add the —permanent flag to your initial command, and it will be included in your Linux system’s firewall rules on startup.
sudo firewall-cmd --add-port=4000/tcp --permanent
If You’re Still Using iptables
The iptables firewall is much more troublesome (maybe a good reason to upgrade to firewalld or ufw). To “permanently” open a port in iptables, you can install the iptables-persistent package to help.
When you first install iptables-persistent on a Debian-based system, it will save your current rules to either /etc/iptables/rules.v4 or /etc/iptables/rules.v6. To add new rules, you’ll issue the following command:
sudo iptables-save > /etc/iptables/rules.v4
OR
sudo iptables-save > /etc/iptables/rules.v6
For those running RPM-based Linux distributions, it’s a bit different. The package is called iptables-services, and the save files are /etc/sysconfig/iptables and /etc/sysconfig/ip6tables.
On RPM-based distributions, there is also a different command used for IPv6 ports. Saving your rules is done using one of these two commands:
sudo iptables-save > /etc/sysconfig/iptables
sudo ip6tables-save > /etc/sysconfig/iptables
Make Sure to Monitor Your Port Usage
As time goes on, your server needs may change. Just as you should keep abreast of the user accounts on your Linux machine, you should also audit your open ports regularly. Close any open ports no longer needed. Along with regularly changing your password, this is a good security practice that will help you avoid system intrusions and security exploits.