![]()
With much debate going on about whether iOS 7 is good or not, there’s no other choice but to pick a side – iOS 6 or iOS 7. I personally think iOS 7 icons are a bit of a Windows Phone ripoff, but hey — what are you going to do… It’s not the first thing Apple has copied or other Microsoft from Apple or Android, it’s really full circle. So while we’re in the Apple mood why not try out a quick Photoshop tutorial on making your own iOS 6 icons.
Finding Good Sample Icons
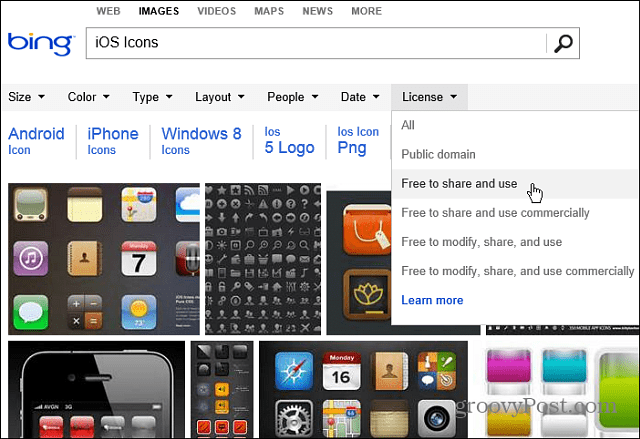
First step is to find an iOS icon sample. Do a quick Google or Bing Image Search for “iOS Icons”. Target your search to get more accurate results using the Exactly search options in Google.
After you’ve found a good PNG icon, save it to your PC so we can open it in Photoshop.

It’s also worth mentioning that Bing makes searching for images and icons that are free to use for personal use much easier.
Getting Started
Import the saved image into Photoshop and make sure it’s a proper PNG. It’s supposed to have a checkerboard grid after the rounded corners instead of the typical white background.
If the background isn’t transparent, you can use anything like the Magic Eraser Tool at each of the four white spots in the corners.

Ctrl+Click the thumbnail of the layer with your imported icon to make a selection of the icon shape. You can then (with the rectangular marquee tool) right click and Fill with any solid color you want. I’ll try black for starters.

Special Effects
Now it’s time to give your icon the shiny iOS 6 look (which is better than iOS 7, of course). Right-click your layer and select Blending Options.

The blending options will allow you to do a variety of overlay layer styles that can replicate the iOS icon looks. Begin with a Gradient and then try some Drop Shadow and Inner Glow. Your final result will look something like this:

And your layer will look like this:

Tip: You can rename your layer (Shift+Ctrl+N) to keep things more organized.
Add Bit of Shine
Now let’s replicate the glossy shine at the top of almost all iOS 6 icons. First, create a new layer. Call it “Gloss” and put it above your icon layer:

Now grab the Elliptical Marquee Tool (hidden behind the Rectangular Marquee Tool). Make a small round shape at the top part of the icon like so:

Without deselecting, pick up your Gradient Tool and quickly make a gradient that fades from white to 100% transparency:
![]()
After creating your gradient, drag it out from the bottom of the selection while holding the Shift key.

Now remove the glossiness that goes outside the boundaries of the icon. By doing a Ctrl+Click on the thumbnail of the Icon Layer and then inverting our selection with Right Click > Select Inverse you can cover the four blank corners. Now we can select the Gloss Layer and press the Delete key to get rid of the excess gloss. You can finish with a quick Ctrl + D to deselect.

Tip: To enhance the effect of the gloss, you can try out different layer overlay modes – some which work good are Screen, Soft Light and Overlay.
Finalizing Your Icon
You can now add any logo you would like to use. Check out my sweet new app – the iSmile! Only $99.99 on the App Store — just kidding, of course! You can use this technique to create as many groovy icons as you want…have fun!


zxc
July 14, 2013 at 3:40 pm
Nice, thanks.
TheAwesome98
March 4, 2020 at 11:49 pm
Great! I use this all the time! Question. How can I make a Cydia/iTunes/AppStore style icon with the sort of explosion thing? And the circle.