How to Make Images Transparent in Google Slides

A good way to change how images and shapes look in your Google Slides presentation is to make them transparent. Here’s how.
Google Slides is a powerful tool for creating and presenting presentations, but the images you want to use may not necessarily fit in with your design.
One solution to this problem is to make the image transparent, allowing text and other elements of your presentation to show through it. This can be used to incorporate images into the presentation design, create a more cohesive look, or highlight certain elements of the slide.
If you’re unsure how to make an image transparent in Google Slides, follow the steps below.
How to Change the Transparency of an Image in Google Slides
Google Slides allows you to make small changes to images. You can use the Format Options menu in Google Slides to alter the transparency levels for any images you’ve inserted.
To make an image transparent by using the Format Options menu in Google Slides:
- Open your existing Google Slides presentation or create a new one.
- Select an existing image in your presentation on one of your slides.
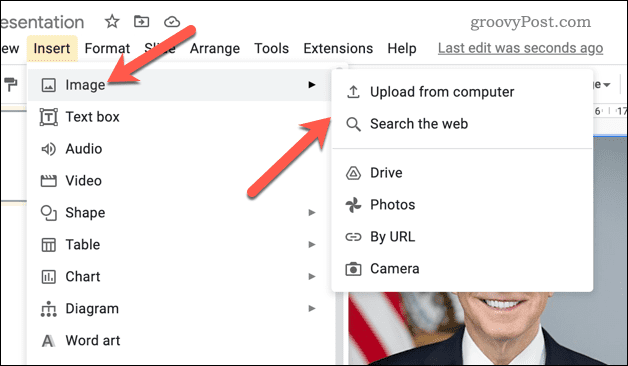
- Alternatively, add an image by pressing Insert > Image and selecting one of the upload options.

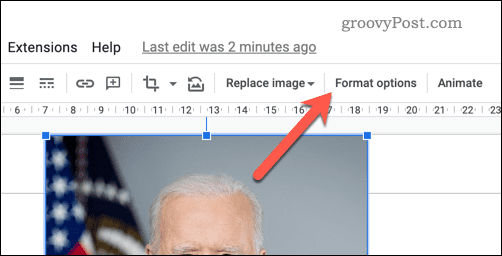
- With the image selected, press the Format options button in the toolbar. Alternatively, right-click the image and select Format options instead.

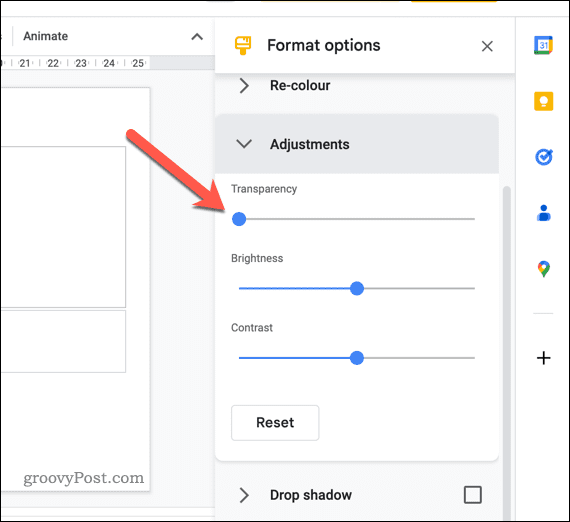
- The Format Options menu will appear on the right—open the Adjustments section.
- Adjust the Transparency level using the slider. Moving it to the right will increase the transparency while moving it left will reduce it.

This method allows you to easily adjust the transparency level of an image, but you’ll need to play with the slider to find the right level for your image.
How to Make a Shape Transparent in Google Slides
If you’ve inserted a shape into Google Slides, you can also change its transparency using the built-in formatting tools.
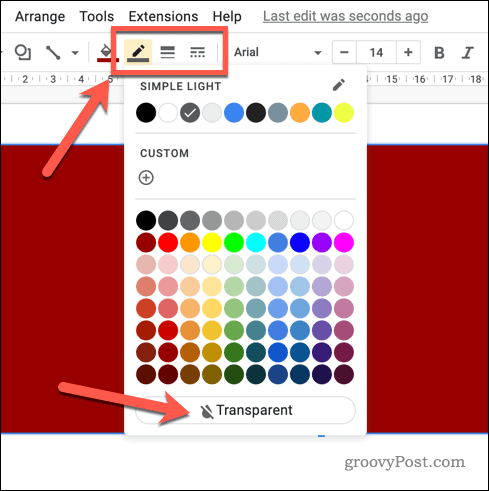
To make a shape transparent in Google Slides:
- Open your Google Slides presentation and select the shape that you want to make transparent.
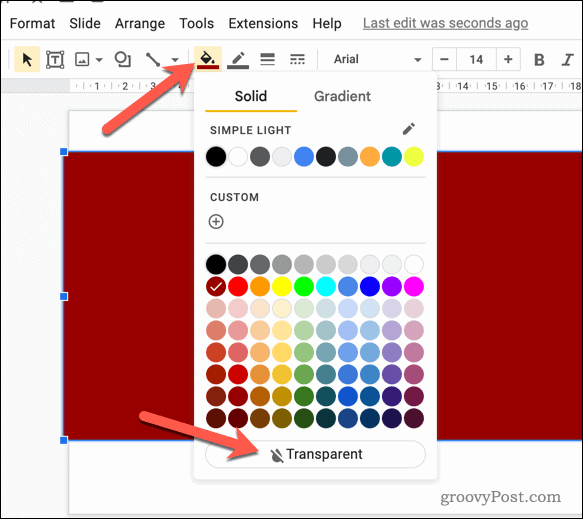
- Locate the Fill Color drop-down menu on the taskbar.
- From the Fill Color menu, select the Transparent option.

- At this point, the shape will be completely transparent, but you will still see a border. If you want to change the size and color of this border, select the Border Color drop-down menu on the taskbar and choose your preferred color.
- To change the size of the border, select the Border Weight drop-down menu and choose the size.
- You can also change the style of the border by pressing the Border dash drop-down menu and choosing the style you want to use.

At this point, the shape should now be transparent, allowing the background or other objects behind it to show through.
Making Engaging Google Slides Presentations
Making images transparent in Google Slides is a great way to enhance the visual appeal of your presentations. By following the steps above, you can easily add a layer of transparency to any image or shape in your Google Slides presentation.
There are other ways you can enhance your presentations, however. For example, you can group objects together to create more complex graphics, create a custom template to give your presentations a consistent look and feel or add your own audio to bring your presentations to life.