How To Share Files and Folders between OS X and Windows 7
In my household, Macs and PCs live in harmony. And thanks to built-in SMB sharing in OS X, sharing files and folders between Windows and OS X isn’t nearly as challenging as it has been in the past. You can get your Windows 7 PC and your Mac OS X computer reading and writing to each others’ files and folders via your home network in no time with minimal fiddling in their respective system preferences.
Let’s take a look at how I do it!
Article Map
- Sharing Mac OS X Files with a Windows 7 PC
- Sharing Windows 7 Files and Folders with Mac OS X
- Changing Workgroups in Windows 7 and OS X
Sharing Mac OS X Files with a Windows 7 PC
Connecting to an OS X Mac from a Windows 7 PC is easier than doing things the other way ‘round, for some reason. Once you set up sharing on your Mac, Windows 7 basically treats it like any other computer on the network.
Step 1
In macOS, go into System Preferences and click Sharing.


Step 2
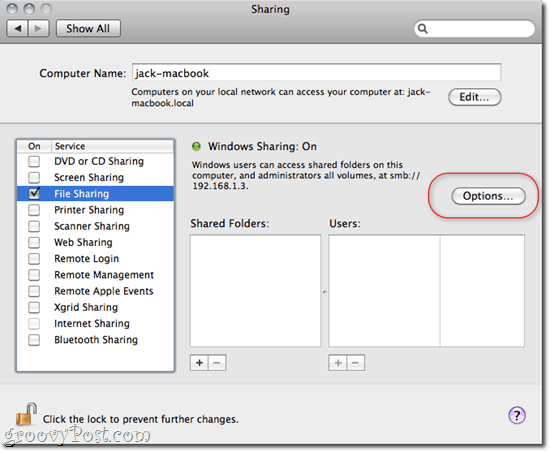
Check File Sharing and Click Options….

Step 3
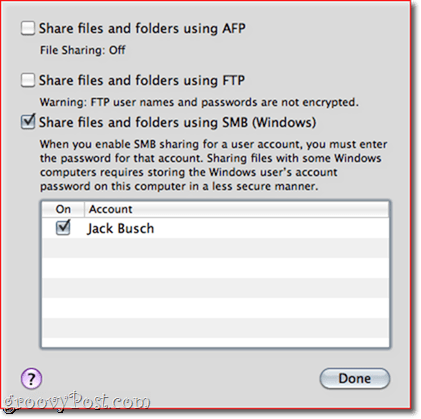
Check Share files and folders using SMB (Windows) and Click Done.
Step 4
From here, you can add folders and set permissions for each user as you see fit using the +/- buttons under Folders and Users.
Step 5
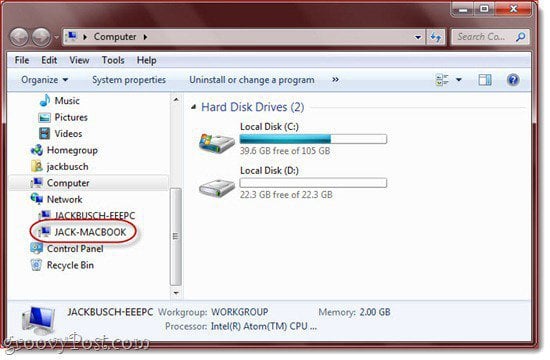
In Windows, the Mac computer will show up in Network on the left. Click it to connect and start browsing. You may have to enter a user name and password–use the login credentials for a user that’s set up in OS X. If you log in as a user that has administrator privileges, you’ll have read/write access to all files and folders. Alternately, you can log in with a user that was set up in step 4 for limited access to only the folders you set permissions for.
Sharing Windows 7 Files and Folders with Mac OS X
Getting OS X to connect to a networked Windows 7 computer ranges in difficulty from simple to slightly awkward. Either way, getting your Windows 7 shared folders onto OS X is a breeze.
Step 1
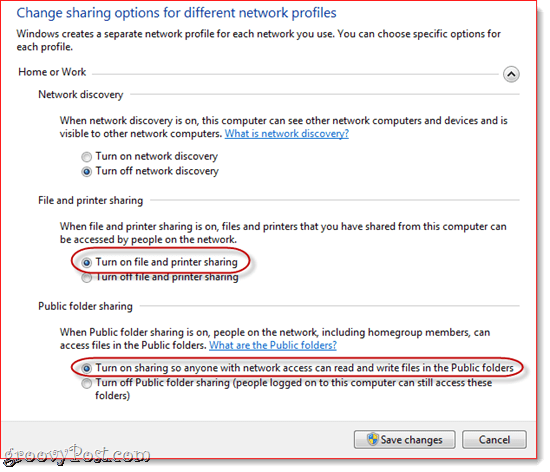
In Windows 7, Click the Start > Control Panel > Network and Internet > Network and Sharing Center and Click Change Advanced Sharing Settings on the left.
Step 2
Scroll down to File and printer sharing and select Turn on file and printer sharing. In the next section, select Turn on sharing so anyone with network access can read and write files in the Public folders (optional–you can skip this if you won’t be using public folders).
Step 3
Click Save Changes.
Step 4
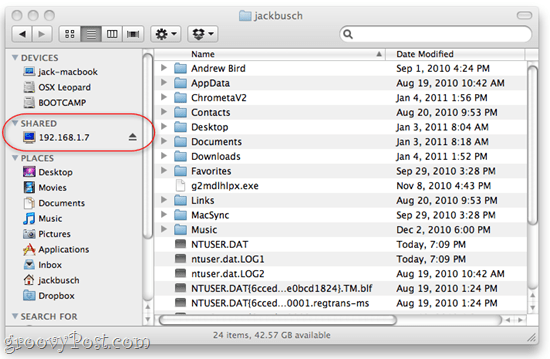
In Mac OS X, launch Finder. If you’re lucky, your Windows 7 computer will show up in the sidebar under “Shared.” Click it to access its shared files and folders.
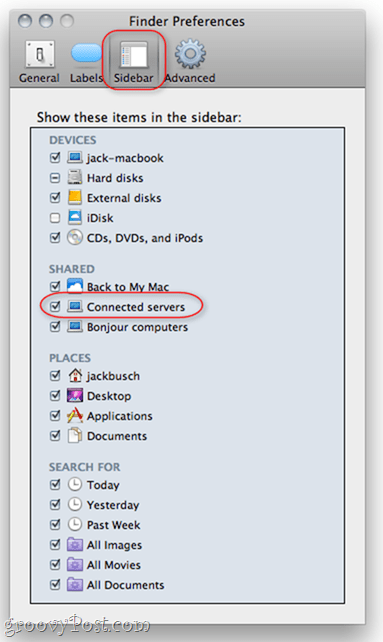
If you don’t see it, then there are two possible problems. The first is that you simply haven’t enabled shared servers in Finder. This is an easy fix. Just go to the Finder menu and Click Preferences and go to the Sidebar tab. Make sure Connected servers is checked.
If this doesn’t fix the problem, you can connect to your Windows computer manually. In Finder, Click the Go menu and choose Connect to Server… You can also press Command – K.
Type in SMB://192.168.1.7, or whatever your Windows 7 machine’s local IP address is and Click Connect. You may be prompted to enter a user name and password. If so, enter the user name and password you’d use to log in to the Windows 7 machine directly, as if you were sitting right in front of it.
Now, the Windows 7 computer should show up in the sidebar.
Changing Workgroups in Windows 7 and OS X
When sleuthing out potential bumps on the road towards Windows 7 and OS X networking, I noticed that some users recommended putting both your Mac and your Windows 7 PC on the same workgroup. Personally, I didn’t do this step and it worked fine. I think that’s because, by default, both Windows 7 and OS X use “workgroup” as the workgroup name. But I tried changing my Mac’s workgroup to something else and file sharing still worked. Either way, you may want to try changing your workgroup name if you are having trouble.
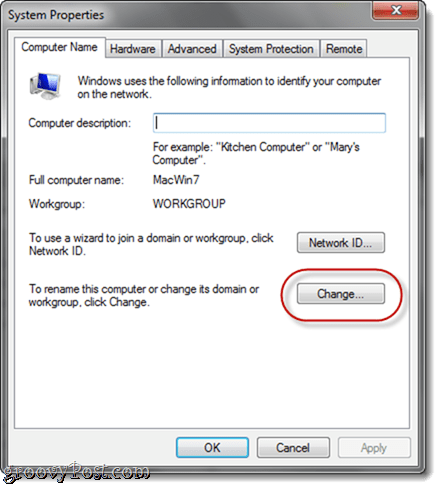
To change the workgroup in Windows 7, Click Start and Right-click Computer and choose Properties. Scroll down to the section that reads “Computer name, domain and workgroup settings” and Click Change settings.
In the Computer Name tab, Click Change.
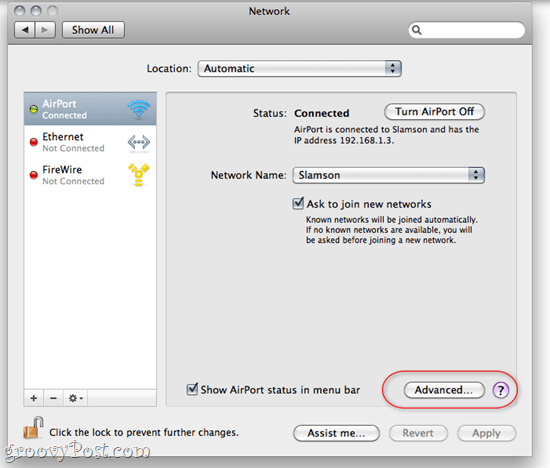
To change the workgroup in OS X, go into System Preferences and Click Network. Select whatever protocol you’re using to get on the Internet (wireless or ethernet) and then choose Advanced.
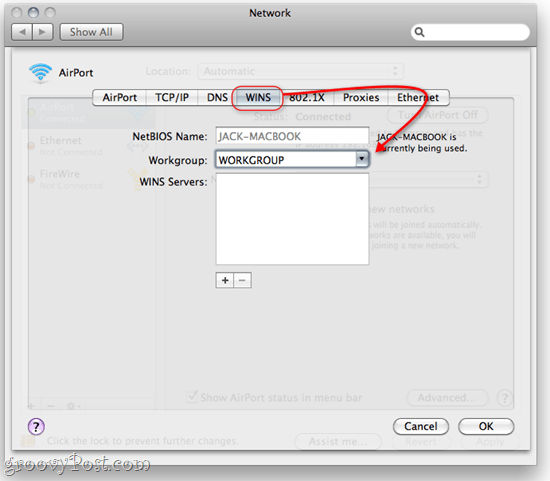
Click the WINS tab. From here, you can type in the name of your workgroup. Click OK and be sure to Click Apply way back in Network settings.
5 Comments
Leave a Reply
Leave a Reply






Greg
December 31, 2011 at 2:38 pm
Great advice, many thanks!
Kevin
January 9, 2012 at 11:26 pm
Worked great. Thanks for the tutorial and directions.
Joe
July 5, 2013 at 6:22 pm
Thank you, thank you, and thank you! I’ve waded through more superiority complexes to find this than I care to mention. This worked for me on the first try in less than a minute. Jack Busch had the sense to include the failsafes that made it work; had he not, it would not have. Had it not worked, I couldn’t work.
Next time you run into a geek who finds it silly, fruitless, or downright disdainful to try and network a mac/pc together tell them about the guy who landed a five-figure contract because he now knows how!
Thanks again!
Jean-Francois
November 3, 2014 at 2:33 pm
Quick note. For Windows, make sure the option «Partage protégé par mot de passe» (french) or in english (loose translation) “Password protected sharing” is disable. This will allow Mac user to connect as a guess on your Windows shares.
Sam
January 9, 2016 at 5:10 am
This is a church av etc section, so everything is on one desk.
I’m trying to share folders between a Windows 10 machine and an AL Capitan. both on the same network, actually same hub. Can see Mac from another Win7 machine but not from win10 machine.
All 3 machines have in common with all naming the same: an administer account, a named user account and passwords on all three the same.
I’ve entered WINS info on Mac: name and password
I’ve made Workgroup name the same. Does it make a difference having a two part name with space between, or does it need to be without spaces or at least a hyphen instead of space?
On the WIN10 machines network discovery is enable, so is file and printer sharing, albeit entering mac computer name or smb netaddress both says Macname not found. Mac sees win 10 machine but clicking on it or go server gives permission error message. Entering admin windows account and password, Mac shakes the login (shakes its head as a no).
I’ve made a similar share between win10 and macmini running Yoshemite and win7 revo before, quite successfully till Macmini got stolen and I found out that Revo 70, although windows 10 upgrade icon says it is compatible with windows 10 is in fact not (finally been told by ACER after repeated attempts to install win10 even with Microsoft guy).
Any help with win10/Capitan would be very welcome.
Thanks,
Sam