Batch Renaming Photos in Picasa + Add Date and Resolution
One of our groovyReaders asked a great question about Windows Live Photo Gallery:
My library wants to “digitize” their old photos. A workshop says they should be in two different formats, TIFF and JPEG. They would need an identifier, such as :”Library photo 1, Library Photo 2,” etc., with a title and place for added description. There are photo management programs such as “Past Perfect” for $870. Is this job anything I could do with Windows Live Photo? If so, could you tell me how to set it up? Thanks, Sarah
Windows Live Photo Gallery can keep track of photo information, such as date taken and location, but in my opinion, Google Picasa 3 does a better job for batch renaming of files. This is because it lets you automatically include the date taken and resolution in the filename, which may be helpful for a massive digital library with different sizes of the same photo (e.g. thumbnail, medium, original). In this tutorial, I’ll show you how to use Picasa’s very groovy batch renaming feature.
Step 1
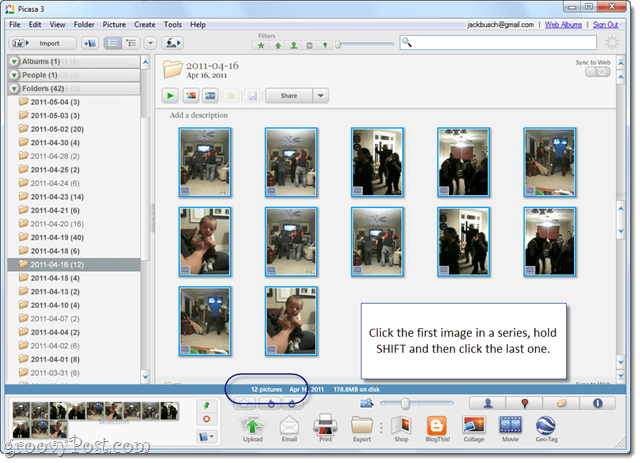
Select two or more images in Picasa. You can do this by dragging a box around the images, or by Clicking the first item in a range, holding SHIFT and then Clicking the last item.
If you’ve successfully selected more than one item, it’ll say so in the info bar along the bottom.
Step 2
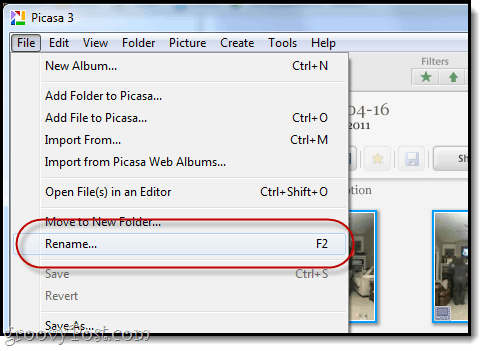
Click File > Rename. Or, press F2 on the keyboard.
Step 3
Type in a base file name for your group of pictures.
Each photo will begin with this name, followed by a number. For example, I’m choosing “Party!” as my base file name. The files will be named party!.mov, party!-1.mov, party!-2.mov, etc.
Step 4
Optionally, you can choose to include the date and/or image resolution in the file name. To do this, Check Date and/or Image resolution. A sample of the filename output will be displayed below.
In this screenshot, I color coded the elements so you can see how your filename is built. Click Rename if you are satisfied.
Step 5
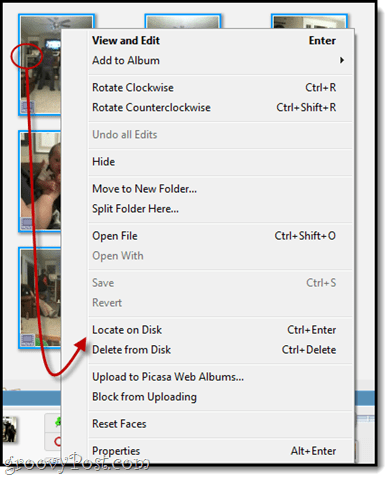
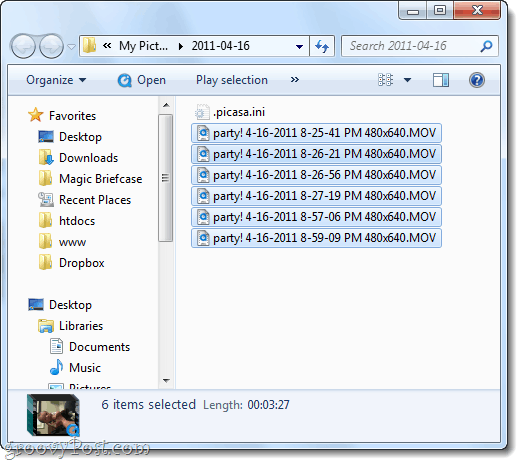
To see how your renamed files look on your hard drive, Right-click one of them and choose Locate on disk.
Note that since each of these movies has a different date, Picasa did not add a sequential number to the file name, since they were already unique.
Conclusion
I hope this tutorial was useful to Sarah and the rest of our groovyReaders. If you are looking for an easy way to convert files from one file type to another, check out the tutorial: How to Convert and Modify Images with Snagit Batch Image Conversion Wizard. Snagit isn’t free, but you can use it for more robust batch file renaming and, of course, awesome screenshots.
1 Comment
Leave a Reply
Leave a Reply


Dorian Markich
October 4, 2015 at 6:56 am
I work on a daily basis with a bunch of different files and the perfectionist in me loves to keep them organized. You can only imagine how many different programs I’ve tried and for how long I had to do everything the hard way! Up until I found out about KrojamSoft! These guys made my life so much easier. This batch renaming software lets users add/remove suffixes and prefixes, change entire names of files and folders at once, change timestamps, convert uppercase to lowercase and the other way around… Perfect!