How to Completely Disable the Camera on Windows and Mac

Worried about your privacy on Windows or macOS devices with built-in cameras? Here’s how to disable them.
In the FaceTime and WhatsApp era, almost every mobile device has a camera that allows you to communicate with others. Windows laptops and MacBooks are no different, but built-in cameras carry their own risks that you shouldn’t ignore.
If your PC or Mac is ever compromised, the feed from your camera could be recorded and used elsewhere. Rather than risk your privacy, you can completely disable the built-in webcam on Windows and macOS devices. Here’s how.
Disabling the Camera on macOS
There isn’t a built-in option to disable the camera on your Mac completely, but you can revoke access to it.
To do this, click the Launchpad icon on your Mac Dock. Locate and click to enter System Preferences, then enter the Security & Privacy menu.

A list of installed software with access to your camera will appear under the Camera tab. To revoke access to any of the apps listed, click to uncheck the checkbox next to the entry.
You may need to press the lock icon in the bottom-left before you can make changes, providing your password or Touch ID credentials to allow access.

In most cases, this should be enough to restrict access to your camera. You can restore access at any time by clicking the checkbox next to an app entry to re-enable access to it.
If you’re still worried, you can also install and use the OverSight app to monitor and alert you to any app that attempts to access your webcam or microphone.
Disabling the Camera on Windows
Unlike macOS users, it’s much easier to disable the camera on a Windows PC. Before you do this, you should check what software is currently using your camera.
To do this, right-click the Start menu icon and click Settings. From here, click Privacy > Camera.
A list of apps with access to your camera will appear under the Allow desktop apps to access your camera section, with information on when those apps last accessed your camera.

A list of Windows UWP apps with camera access will appear under the Choose which Microsoft Store apps can access your camera section.
You can click on the sliders next to each app to enable or disable camera access.

To disable all access to your camera, click the Change button under the Allow access to the camera on this device category, then click the slider to disable the Camera access for this device option.

This should disable camera access for all UWP apps and most (but not all) desktop software. To completely disable your camera, you’ll have to disable it in the Device Manager.
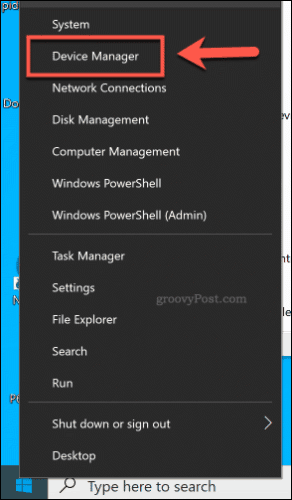
On your Windows desktop, right-click the Start menu button and click Device Manager to access the list of attached devices.
In the Device Manager window, click to open the Cameras category. If your camera isn’t listed here, try the Imaging Devices category.
To disable your camera, right-click on your camera device listed under either category, then click the Disable device option.

Windows may ask you to confirm whether or not you actually want to disable the device. Click Yes to confirm.

Once confirmed, Windows will disable your device. If you ever need to restore it, right-click the entry in Device Manager and click the Enable device option.
Of course, if you’re still paranoid that your OS isn’t keeping the camera turned off, you can always cover it up with a piece of tape.
Improving Privacy and Security on Windows and macOS
Disabling your camera is a sensible precaution, but you should think about other ways to improve your privacy and security on Windows and macOS devices. If you’re a Windows user, keep your Windows PC secure while you’re out and about.
macOS has a better reputation for security, but it isn’t perfect. Rather than using the Trash, consider securely deleting files on Mac instead to protect any sensitive files from being recovered.


