Ultimate Guide To Making Your Own Time Lapse Media
Time lapses are very enjoyable to watch. They are pretty hard to do though, right? Think again – time to make your own Time Lapse with our detailed guide.
Time-lapse videos are incredible. They combine photography, cinematography, and video editing into one new great art form that really shines with its unique approach. Although they may seem really difficult to do, they are now fairly simple to create. Let’s get started.
Things You Will Need to Create Timelapse:
- A device capable of capturing a timelapse (Smartphone or DSLR)
- A modern PC or Mac with decent specs
- Adobe Creative Suite or any other editing software you prefer
Methods:
- Video sped up to twice the original speed (or more)
- Photos stitched into a video.
Method 1 – Video sped up – Use a DSLR or other camera
The easiest way to create a time-lapse is to put your smartphone or camera on a tripod and record a video, which you will afterward speed up on your computer.

If you have a DSLR or any other kind of still-image camera that can also record video, you most likely already have a tripod. If you don’t, you can improvise by putting the camera on a flat and stable surface.
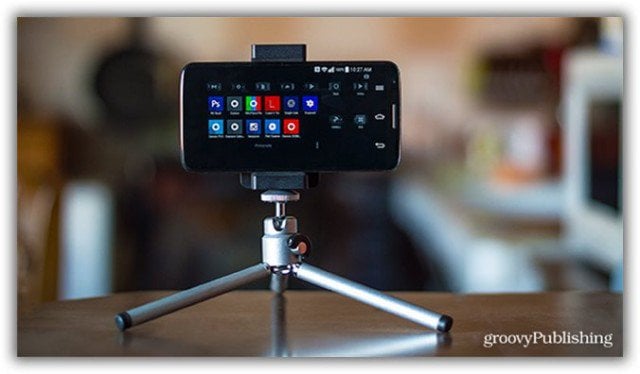
For smartphones, you can get small tripod brackets bundled with mini tripods at a meager price. You can also attach the bracket to a professional tripod if you happen to have one.

Once you’re all set with your composition and recording settings, press record and leave the camera for a few minutes! (Note – DSLR cameras usually have a time limit of up to 20 minutes per video)
When you’re done with the video, upload it to your PC and use the video editing software of your choice to speed it up. For this tutorial, I’ll show you how to do it in Adobe Premiere Pro since it’s one of the most widely used programs.

Start by launching Premiere and creating a new project with your desired dimensions. I’ll make a 720p timelapse this time.

Now import your clip, drag it onto the timeline and speed it up with Right Click > Speed/Duration.
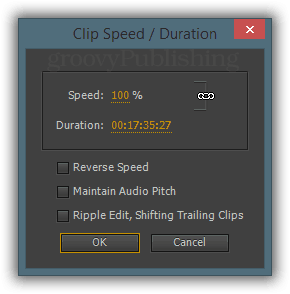
From the “Clip Speed/Duration” dialog, either input the playback speed in percentage (for instance – 2 minutes played at 200% is 1 minute) or input the desired clip length to have the percentage automatically calculated for you.

You can then preview the result by going over to where your sequence program is located and pressing the play button. Note that you may experience frame drops on slower computers since the sped-up playback is quite hard to process in real-time.
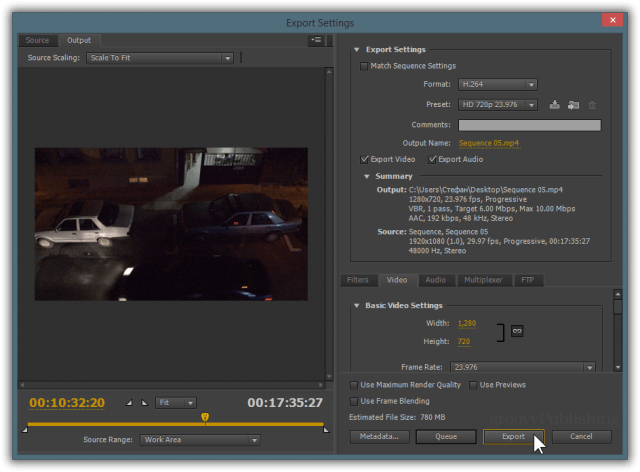
If you’re happy with the final result, you can export your masterpiece by going to File > Export > Media. From the dialog, you can choose many different formats and presents. My favorite is exporting an H.264 MP4 file with one of the HD presets.
Method 2.1 – Photo stitching – Option 1 use Lapse it Pro for Android or iOS
There’s Lapse It – a great application for making time-lapses on your mobile phone, available for iOS and Android, for those of you who don’t have access to DSLR cameras with intervalometers. To access the full version, capable of recording high-quality time-lapses, you’ll have to set yourself back with $2 bucks, but you can still check out the free version if you’re not 100% sure if this is for you.

First off, start the app and go to Settings to configure everything capture and export-related.
Set your phone up on a stable surface or using one of those mini smartphone tripods that we already talked about in Method 1.
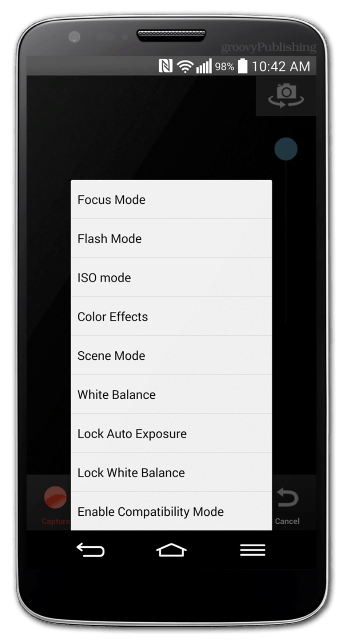
Go to the Capture option to look at your composition and check out a few additional settings, such as Exposure, ISO, Flash, Focus, and even a dedicated compatibility mode for older devices.

After finishing your time-lapse, you can apply various effects, trim to determine which frames get used in the video and even add music to it. Once you’re done, you can click the render button to export your masterpiece in a format of your choice.
Method 2.2 – Photo stitching – Use a DSLR with an intervalometer
This is by far the hardest and most time-consuming method of all, yet it will bring you a truly professional time-lapse with an amazing resolution. If you have a powerful computer, you can even render your final project in 4K (UHD)!
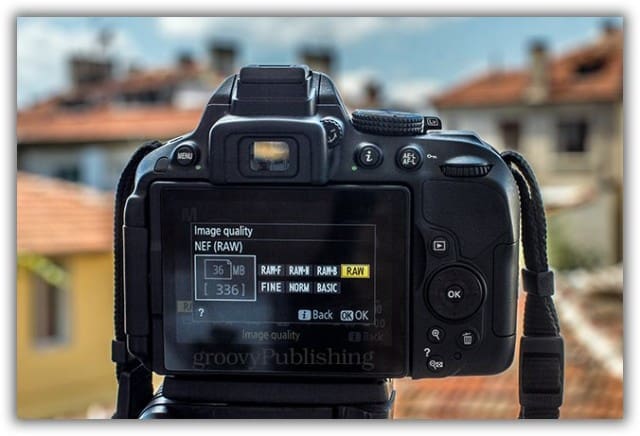
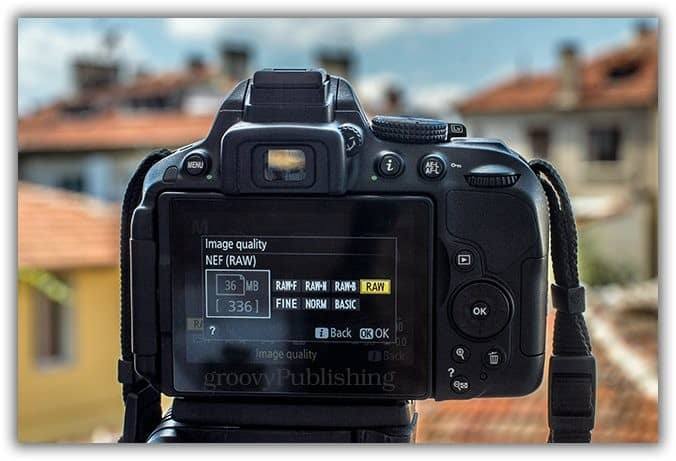
The first step is to put your DSLR on a stable tripod obviously and to frame your shot. Before starting the capture, you should take a minute to think about how much free space you have on your SD card. NEF files can go all the way up to 40 MB and more, while even large-size JPEGs are usually around 10 MB only. Take that into consideration and remember – 24 images equal 1 second on your video.
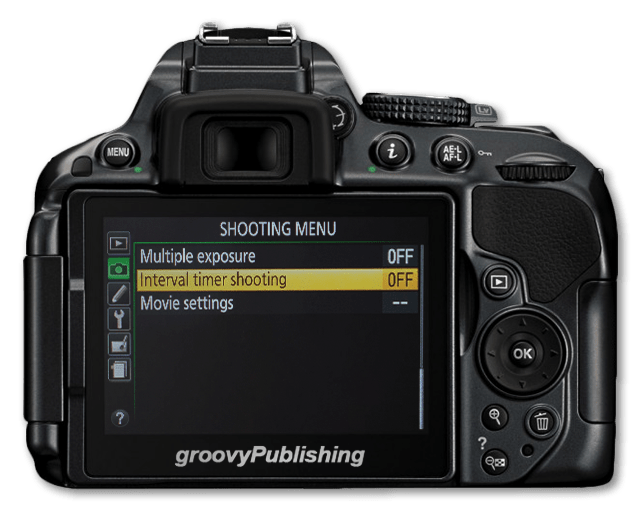
Look up your DSLR’s instruction manual to find out how to access your built-in intervalometer. (Note – not all DSLR cameras have one built-in. If you find out your camera doesn’t have one, you can always purchase one separately.)

From the interval setting, you can pick the delay between each shot. If you want to have a timelapse which is less choppy, choose a smaller interval. If you want time to really “fly” in your video, choose a larger one. It’s all trial and error – if you get it wrong this time, you’ll know what to do the next time you try this out.

The next setting will let you configure the number of shots that the camera has to take. A bad limitation on most cameras is that the built-in intervalometer lets you take only up to 999 shots. Calculated that’s 999 / 24 = 41.6, so just under 42 seconds. To calculate the required number of shots, multiply your desired length by the framerate you’re going to use. For instance, if I wanted a 20-second time-lapse at 30 FPS, that would be 20 x 30 = 600 shots. (Note – If you want to take over 999 shots for a time-lapse, consider an external intervalometer.)
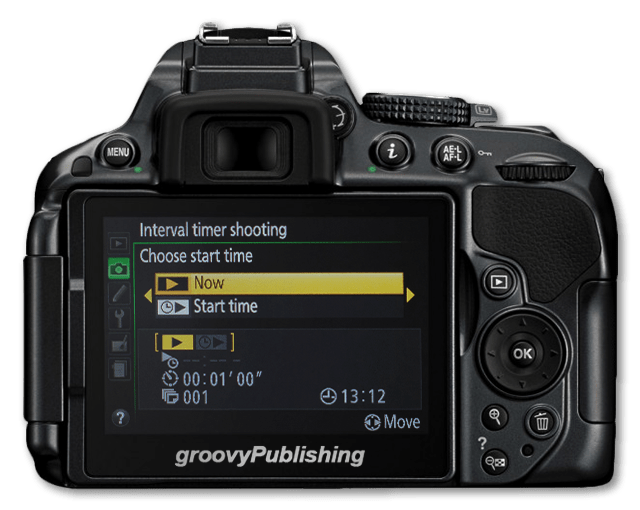
Finally, you’ll have the option to choose whether to start the intervalometer now or to configure a delay (useful for times when you’re waiting for a sunset or sunrise). For this occasion, I’ll pick “Now” and get started right away.

While shooting a time-lapse with the built-in intervalometer, you will most likely see a small notification message displayed on the screen. For the D5300, it’s “Interval timer shooting.” It’s a good idea to step away from the camera and let it do its job. Even the slightest shake will show up in the time-lapse, and that’s not advisable.

After opening After Effects, the first thing you want to do is navigate to Edit > Preferences > Import. From there, make sure that the Sequence Footage framerate is set to the framerate you will be using for the current project. I set mine to 24.

Make sure the folder you’re going to import has all the filenames under a sequence. This way, After Effects, will easily figure out what to do with the files. The files also need to be JPEGs, not RAW files – if you shot RAW, process your files via Lightroom to turn them into high-quality JPEGs.

Start by dragging the folder into the Project panel.
Click on the “New Composition” button to configure your project dimensions and framerate.

Pick a framerate identical to the one you configured in “Import Preferences” and choose the length of your comp. Don’t worry – if you’re not sure how long your timelapse will turn out, just put in something like 5 or 10 minutes – you can always edit this value later on.

Drag your JPEG Sequence to the Timeline.

Use Right Click > Transform > Scale to make larger images fit the 1080p resolution.
![[Optional] For those of you who didn't input the correct comp length at the beginning, you can now right click on the comp and select "Composition Settings" to change it to as long as the sequence turned out to be. Mine is about 25 seconds.](https://www.groovypost.com/wp-content/uploads/2014/08/7-After-Effects-Change-Composition-Length.png)

Here’s where you can get creative. Since you have a big bunch of high-fidelity JPEG files to work with, you can apply an enormous amount of effects and corrections to improve dynamic range, color accuracy, and more. Select your JPEG sequence from the Timeline and click on the Effect tab’s effect to apply it to the clip.

Here’s a before/after comparison of what you can achieve with effects. I pumped up the saturation quite a bit and added more sharpness and clarity to the final look of my time-lapse.
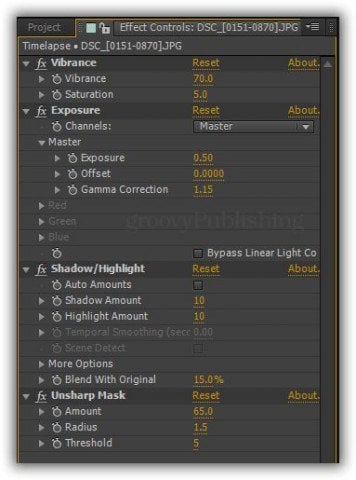
Here’s a closeup of the specific values I used for the effects I applied. Remember – these will vary depending on the camera, file quality, resolution, capture settings, and more. Tweak them to your preference until you get the look you want to achieve.

Once you’re ready to export, you can go to File > Export > Add To Render Queue.

You can choose your desired export format, resolution, codec, and more from the render queue. I have a personalized preset called “Stefan’s H.264,” which is exactly what it sounds like – an MP4 file with H.264 encoding with customized bitrate and quality to my liking.
If you don’t want to go too in-depth about export quality, however, feel free to choose one of the pre-made export presets.

Finally, if all seems well, hit the render button. After doing this, it would be a good idea to leave your computer alone for as long as it takes to render the video. Processor, RAM, and GPU usage will be at an all-time high, so your computer will be rather unresponsive while exporting. Since heavier projects can take up to 2 hours and more, make sure you double-check everything before you begin rendering – you don’t want to wait several hours for a render, only to find out you didn’t get the desired result in the end and have to redo everything.


Elben
August 26, 2014 at 7:24 am
Nice post. GroovyPublishing looks like the brand of the camera :)