Even with a few dozen clients, making sure software is up-to-date is time consuming. With a few hundred, it’s a nightmare. Microsoft’s Group Policy has a feature that allows you to deploy MSIs (Microsoft Installers). This process greatly improves the experience of deploying software to client computers.
Disclaimer: Don’t attempt this on your production network before you try it on a one-computer test unit container. groovyPost does not assume responsibility for data loss or damage on your network. Always back up key files and proceed with care.
From a Domain Controller, open the Group Policy applet. Locate the container with the computers that will be receiving this deployment. In this case, we’re deploying to the Workstations container.


Right click on the container you’re deploying to, and select Create and Link a GPO Here.


Enter a name. Use something that will help you remember what it’s for. I often use the date I made the policy.


Double click on the object you’ve just made


Here is the window where you can configure your group policy object (GPO). In this case, we want to select Computer Configuration >> Software Settings >> Software Installation. Right click on Software Installation and select New >> Package.


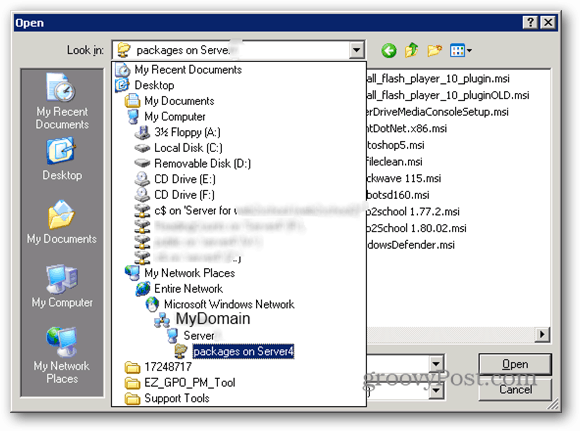
At the prompt, locate and select the MSI file (the package) to be deployed.


It is imperative that you navigate to this file over the network – even if the package resides on the server. Why? The path you use is the path the clients will use to find the file. C:\shared doesn’t help the clients when they need \\server\shared. Also, make sure the directory and the file have read permission for the clients, otherwise they won’t be able to install the package.


Once you’ve selected the package, you will be asked to select the deployment method. Leave it on the default, “assigned” and click OK.
The system will check the package and make sure it is appropriate for deployment. Once in a while I run into an installer that won’t deploy – something was corrupted somewhere in the creation process. If you run into that, try downloading the file from the source again and repeating the new/package step. If it still doesn’t work, you’ll need to find another source or another program.


If you see a listing on the right, as shown above, you’ve done everything successfully. Now close up the windows you’ve opened.
All the systems in the selected container will get the package at the next reboot after their group policy settings are updated. If you refer back to the beginning of this article, you’ll see that the container Workstations will be the one that gets this installation.
Sometimes the group policy update can take a while, so if you want to test it, you can go to your test client and open a command prompt – and enter gpupdate /force (which forces the client to get the most updated group policy settings from the server) – then reboot. You’ll see the installation occur before you log on.
1 Comment
Leave a Reply
Leave a Reply


AlexT
March 31, 2016 at 3:01 am
Hi Jeremy,
I’d like to share my experience in deploying MSI packages lately. I’ve ran into a tool called Total Software Deployment a while ago and I guess that it can be a very useful alternative to SCCM or other products that can deploy software across your network. The tool is simple and easy to start with when you don’t have much time to prepare a complex scheduled deployment task, but you need to update or install a few applications remotely. TSD also allows creating deployment packages in 3 different methods, so you are not restricted to MSI or EXE files. A few thing that I didn’t like are that you cannot remotely uninstall an application using this tool and there is no way to schedule a deployment task like you can with SCCM. I hope that these features will be added in the future. Anyway, I recommend checking out this tool. May be a helpful addition to your “must have” software list.