Install A Loopback Adapter on Windows 7
The Microsoft Loopback adapter is a groovy little tool originally designed for testing network configurations. Over time, however, many other uses have been found for it – such as networking two computers together without using a cross-over Ethernet cable and connecting virtual machines to the internet. We’ve covered setup for the loopback adapter in XP and Vista but for reasons unknown Microsoft annoyingly decided to hide the “Add New Hardware Wizard” in Windows 7. This arrangement changes the setup process around and can make it tough to start, so here is a new groovy How-To guide just for installing the Windows 7 Loopback adapter!
How To Setup A Loopback Adapter On Windows 7
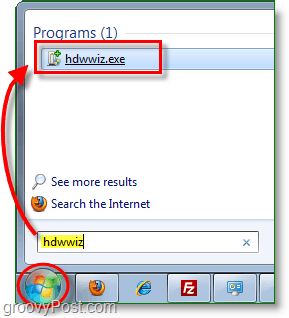
1. Click the Start Menu Orb. In the search box Type hdwwiz and then Click the hdwwize.exe program link.
2. Now the Add Hardware wizard should be open. Click Next through the first page, and then on the second Select Install the hardware that I manually select from a list (Advanced). Click Next to continue.

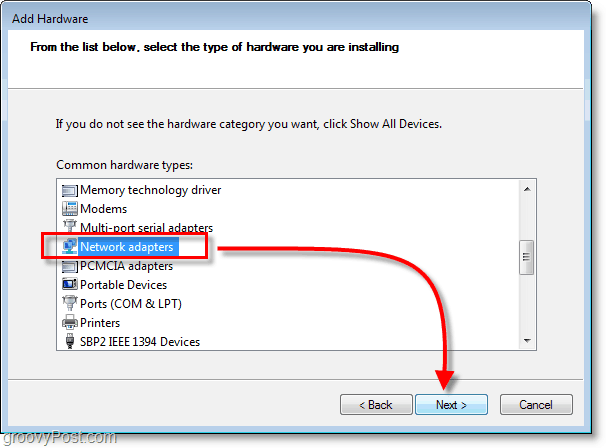
3. Scroll down the list and select Network Adapters then Click Next.
4. Give the next window a moment to load, and then click Microsoft and Select Microsoft Loopback Adapter then Click Next.

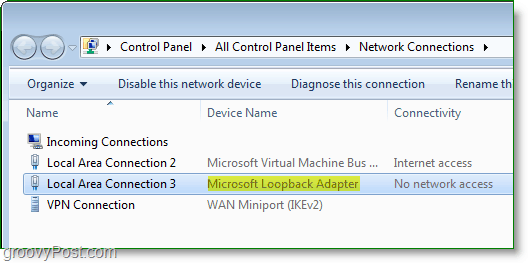
Now the Microsoft Loopback Adapter should be installed, and it will show up in your network connections window. From here you can easily configure your adapter to do whatever you’d like.


malowanie warszawa
November 21, 2010 at 1:39 pm
Thanks an eye to acutely attractive article. He was really helpful. Highly recommend.
Chris
December 27, 2010 at 8:22 am
Awesome & simple instructions!
MrGroove
December 27, 2010 at 5:25 pm
Glad it worked for ya! Thnx for the feedback.
anil
March 21, 2013 at 5:43 pm
thanx its worked
jiyas
January 6, 2011 at 3:59 am
thanx… how to manualy open “add hardware wizard” without hdwwiz command????
kriss
February 6, 2011 at 4:00 am
it seems like i dont have to microsoft loopback as a choice to pick as i do the same things as u do, i have gotten into the last step, but i cant pick loopback since its not a choice. what should i do? is it possible to download it?
Mullaiselvan. M
March 6, 2011 at 11:29 pm
Thanks for clear presentation.
Ramesh
March 10, 2011 at 12:13 pm
Great help;
Make the installation smooth…..
Thank you.
farra
April 14, 2011 at 6:30 pm
THANK YOU!!!
dylon
May 12, 2011 at 3:07 pm
i dont have network connections, atleast i dont see it, the only N I have in all control panel items, is network and sharing center
Good Stuff
July 8, 2011 at 6:04 am
Thanks heaps. Good easy tute.
ya
July 31, 2011 at 8:00 am
thanks .simply help me
Vanessa
October 23, 2011 at 5:14 am
Thanks. I need this to setup SDM on GNS3 :)
Mina
November 19, 2011 at 1:22 pm
Thank you very much. this was so helpful. I spend hours truing to find out how to install the adaptor. I am a student and was about to give up and then I found this information form you. Thanks a lot.
Terrence
December 12, 2011 at 11:33 am
Thank for posting this. Windows 7 does seem to hide simple things easily available in XP
Gonzalo
December 13, 2011 at 2:17 pm
Thanks… Really smooth. Plus it is the first hit in Google, just took me 5 minutes to solve the problem.
Lacko
January 13, 2012 at 8:17 am
Hi, thank you for your help!
Kiran
February 1, 2012 at 10:20 pm
Thanks its help me lot
Alex Balan
August 28, 2012 at 10:53 am
Thanks mate, it really helped … i did it for 15 seconds .. while i was on microsoft site and reading it i spend more than an hour without doing anything … THANK YOU !
Steve Krause
November 27, 2016 at 8:43 am
Fantastic! Glad the article was able to help!
Blackhole
May 2, 2013 at 8:32 am
THANKS very much , it helped , i love you guys!
hassan
July 26, 2013 at 2:28 am
thank a lot bro ,it helped me a lot
Dilip
November 20, 2015 at 10:55 am
Thanks a lot dear
federico
April 1, 2016 at 2:06 pm
thanks you saved my day!
Steve Krause
November 27, 2016 at 8:44 am
Awesome! Glad this old guy is still helping people out!
jk
July 5, 2016 at 11:14 pm
thanks…. very helpful
Steve Krause
November 27, 2016 at 8:43 am
Excellent! Glad the article was able to get ya through it!
Thierry
February 6, 2018 at 5:44 am
Working fine, thanks very much Steve
BJ
June 28, 2019 at 3:08 am
Alternatively, you can open Device Manager, right click your ComputerName (the top most item) and select “Add Legacy Hardware”