How to Enable Last Access Time Stamp To Files on Windows

To save system resources in Vista, Microsoft disabled the Last Access Time Stamp. With Windows 7, this timestamp remains disabled. Windows 7 isn’t the system hog than Vista is. So I think it’s time we turn the ‘last access time stamp’ back on. Especially since most of you probably never knew it was disabled in the first place.
This trick can be useful if you think someone or something (malware) other than you might be using your computer. Or perhaps you’re a forensics corp IT guy? Anyway, a few things to keep in mind before we get started:
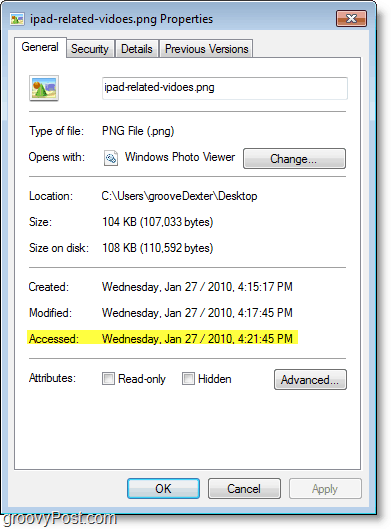
1) Enabling or Disabling this won’t make your Accessed date vanish or reappear, rather it will only change if Windows updates the timestamp or not.
2) If a last accessed timestamp already exists for your file, it will remain persistent unless this feature is enabled. Once enabled, however, all of your apps will become aware of when they are being used/accessed.
How to Add Access Time Stamps to All Files on Windows 7
1. Click Start and then search for cmd. Once that comes up right-click cmd.exe and select Run as administrator.
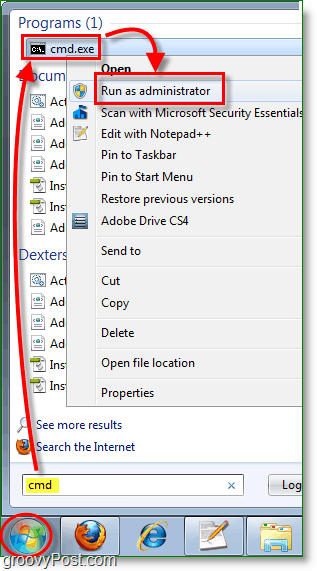
2. When the UAC prompt appears click Yes.

3. Now in the cmd prompt, Type in “ fsutil behavior set disablelastaccess 0 “ and press Enter.

4. Restart your PC for changes to take effect.
Now timestamps are enabled, and you’ll be able to see when files are accessed from now on. Take note on really old PCs this might cause performance issues, but even that isn’t too common.
Okay, now we’ll look at the other side. Maybe you have Time Stamps enabled, but you are ready to give them the boot.
How To Disable Last Access Time Stamps In Windows 7
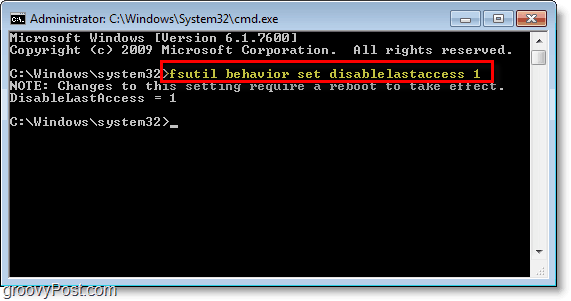
Open the cmd prompt from administrator mode like before, but this time type in “ fsutil behavior set disablelastaccess 1 “
How To Use Last Access Time Stamps In Windows Search Results

Manually looking through the properties of every file on your system could take years. This scenario is where Windows Search comes into use. Using Search + Timestamps you’ll be able to sort by access date and see exactly what went down on your PC, exactly when it all happened, and sometimes even in what order.
1. In the Start Menu search area, Type * and press Enter.
Searching for a * sign signifies that Windows Search should pull up every single file on your computer. The ‘See more results’ button is another great way to get into the searching mood.

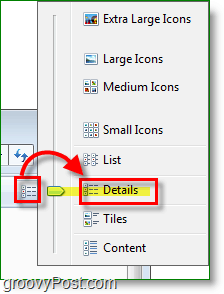
2. Switch the Window view to Details.
3. Right-click the category bar and click More.
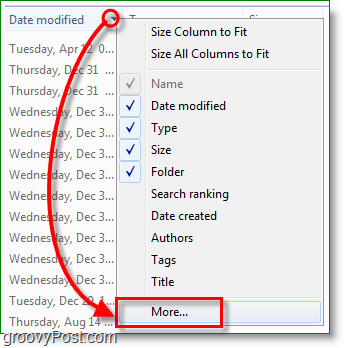
4. On the next window scroll down and check the box for Date Accessed and then hit OK.
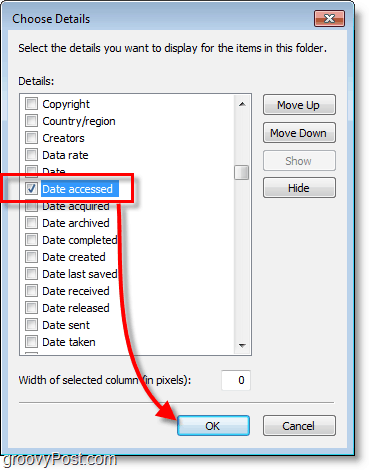
Now when you do Windows searches, it will display the “Date accessed” category and you can organize it better than this picture by just clicking the Category name.

Comments or suggestions? Post it below or join the discussion in the groovyPost community forum!


Shockersh
February 2, 2010 at 8:46 am
Lol nice… I had no idea it was turned off. Just checked and yup , your right!!
MrGroove
February 2, 2010 at 5:25 pm
Yeah, you would think Microsoft wouldn’t be displaying the “Last Accessed Time” if they weren’t keeping track of it on the OS…
Nice job ms….
Dweeberly
May 7, 2010 at 12:45 pm
Very good post (great job with layout).
I was actually trying to use the last accessed date, when I found that it was disabled. I followed the directions (including the reboot) but my accessed date still doesn’t change as expected. I have a test file that I “type”ed out (cmd prompt) in the command line, loaded into two editors (notepad, notepad++, opened file, closed file, no changes). I thought it was not working at all, then I see that it did update the last accessed time. I tried again and 20 mins later, there is still no update to this data. I even closed all my windows explorers and reopened one, still no change. Very odd. I suspect that MS shipped this feature disabled because it doesn’t work in a reliable way.
Folks might want to reconsider turning this on, given that it doesn’t produce reliable results. Shame I could really use it
Thanks for the info, perhaps MS will patch this in a SP.
Dweeberly
May 28, 2010 at 10:27 am
BTW I found out what was going on. This link
http://social.msdn.microsoft.com/Forums/en-US/netfxbcl/thread/784cfb4e-515c-497f-a593-4c68bfa1cec8
States:
Depends on the file system type I guess. For example, the last write time is not fully updated until all handles that are used for writing are closed, and NTFS candelays updates to the last access time for a file by up to 1 hour after the last access, or not at all if HKLM\SYSTEM\CurrentControlSet\Control\FileSystem\NtfsDisableLastAccessUpdate is enabled.
So updates for the last access time can be delayed by up to an hour.
Spokeo
February 5, 2011 at 3:15 pm
This is great advice – thanks for the detailed description and the graphics. I was just saying today on another post (where I was looking to see how to open the command prompt as an administrator, as you suggest we do… it cmd doesn’t open this way automatically for me) that Microsoft will make us experts and will turn us into ex-Windows users. I am switching to Linux soon.
JJ Barea
June 14, 2011 at 11:18 pm
Thanks a lot.
This write up was very help and well written.
I just followed your instructions and i was good.
Thanks.
Peter Goodger
July 12, 2011 at 12:41 am
I thank you for your post it was very helpful. I wish to ask a question, at any time during the XP Windows evolution was the Last Accessed Time stamp activated? In other words was it automatic or required manual starting via cmd.
MrGroove
July 12, 2011 at 7:29 am
Hi Peter – I’m pretty sure it was Auto.
Jay Tensing
July 15, 2011 at 10:34 pm
Hi!!
I tried exactly the fsutil command from the command prompt to disable the NTFS. I also changed the registry default settings on the ntfsDisableLastAccessUpdate file. I have then done a reboot but the access times on the file still change to the current date when I copy the files from one folder to another.
I am using Windows 7. Please let me know if there is anything else that I am missing inorder to disable the NTFS Time Access.
thanks !!
Jay
rubel
May 26, 2012 at 2:35 pm
thanks for ur useful post. but I need to know that, “which files have been accessed when I was not in home?” is this possible by any third party software?
Austin Krause
May 26, 2012 at 6:59 pm
Rubel, just use the search function outlined in the article above. Once you’ve sorted results by the date accessed you can just compare the times you were not home with the times the files were accessed.
For example, if you work from 9am-5pm. You’ll know that most files probably shouldn’t have been accessed between that time, so if you see a file accessed during that time in the search results you should probably inspect what is causing it.
montanaksc
July 19, 2012 at 10:20 am
I have been frustrated by Windows 7 disabling this time stamp which has been valuable to timekeeping in our office. What luck that I was FINALLY so frustrated I searched to find out if there was a solution and–here it is! I’m looking foward to seeing my “Accessed” column active again after I reboot–Thank You!
Sebastian
April 1, 2013 at 8:22 am
Hi,
There is any way to order files by access count, in other words,windows stores the amount of access to the files?
I want to order by this criteria.
Thanks in advanced.
mark owen
May 9, 2013 at 5:57 am
thanks very very much
Jeff Mowery
August 3, 2013 at 7:37 am
very detailed explanation. However I have Windows 7 Ultimate and my file access date always changed upon copying/cutting the file, and I did not do anything as far as settings go.
Rosie
December 4, 2014 at 3:17 am
Thank you for your post. My computer already shows the “Last Access Time” for each file but not for my folders. Do you know if it is possible to find the “Last Access Time” of a folder?
Thanks
Rosie
Jostikas
June 15, 2015 at 9:13 am
I should note that there is a good reason, now even more than in vista days, why access time is disabled. Writing access timestamps produces a lot of small random writes.
Back then, computers were mainly HDD-based, and HDD-s are notoriously slow when it comes to random access. However, given that the update would happen while the file is read anyway, it’s at least possible to optimize it, so it happen in one pass.
Now, more and more computers have SSD-s, and large amounts of tiny writes actively degrades the flash memory that SSDs are based on. SSD-s can do tiny random reads at blazing speeds, but it is the nature of flash memory that a tiny overwrite causes rewriting of a whole page. And writing is what degrades an SSD.
Tim
May 16, 2020 at 3:10 am
Enabling this does change date accessed, but for every single file in the same folder as the file I actually accessed. Why do they all update just because they were in the same folder? I want each individual file to update when I open each file, not the entire folder.