How To Use Rainmeter to Customize Your PC Desktop

Rainmeter is a tool that allows you to change the look and feel of your desktop. Here is a look at how it all works.
Have you ever wanted to customize your desktop in more ways than just moving around icons and changing your background? Do you want to up your battle station game? Well, you’ve come to the right place. Rainmeter is the perfect tool to improve the look of your desktop, and there are many options to choose from when deciding what you want.
Rainmeter is a bit tricky to navigate, and not all of the themes and skins are going to work incredibly well. The skins are very community based mainly those created by independent creators, so it’s all about trial and error. In this article, I’ll guide you through the basics of setting up Rainmeter, finding skins/themes, and setting them up on your desktop. Rainmeter is very simple to use with the right skins, and the final product can be amazing. So let’s get started with downloading Rainmeter.
Downloading And Setting Up Rainmeter
First, you’re going to want to visit the Rainmeter Website. On the landing page, you’ll see two download options. You can either download the beta version or the final version. For this, we’re going to be downloading the final version.

Once you click download final it will prompt you to save the setup file into downloads. Click save and wait for it to download. You’ll then want to locate where it’s saved in your file explorer and double click the setup file. The setup wizard will prompt you to choose either the standard installation or portable installation. We will do the recommended standard installation. Standard installation is selected by default, so you’re just going to want to click next.

After you click next, it will prompt you to choose where to save the program file. We’ll just go with the default location. You’ll just want to click install and select allow when prompted to allow Rainmeter to make changes.

Now that you have it downloaded, some default skins will appear. This is a preset layout Rainmeter has loaded by default. There are multiple ways to open the main menu of Rainmeter. You can right-click on the default loaded skin and click manage skins.
Either that or you can locate where the shortcut icon for Rainmeter was saved and double click that. I have it in my toolbar, so I’m going to open the Rainmeter menu from there.

Once you’ve opened the Rainmeter menu, you may be a bit confused. There’s a lot to process on the menu, but rest assured you don’t need to understand every part of this menu to get a nice looking desktop. In the next part, I’ll discuss how to load skins now that you have Rainmeter downloaded and know how to get to the menu.
Loading Rainmeter Skins
The process of actually downloading a skin and getting it on your desktop is pretty simple. Finding a good skin and customizing that skin to look the way you want is where things get kind of confusing. To start off, let’s locate the skin. Remember, the community that creates Rainmeter skins is Open Source meaning anyone can create a skin and post it online for download.
This also means there’s a chance of malicious activity. Whenever you download something posted from an independent source that you can’t verify the integrity of, there’s a level of caution and understanding you need to have when going into it. Be careful when downloading a skin and make sure that you’re not downloading anything you don’t want to download.
With that warning out of the way, let’s go on to actually locating and downloading a skin. Through this process, I’ve been using the website Visual Skins to find the skins I want. You can also find skins on deviant art. Rainmeter provides a list of resources you can use as well to find a skin you like.
I’m going to be using a skin I found on Visual Skins to demonstrate downloading skins. To start off, locate the download link for the skin you want to install.

This is the download link for the skin I’m going to be demonstrating.
Once you click that, the skin should automatically download. To activate it, locate where the skin was downloaded and double click on the file. The icon should look something like this:
![]()
Double click on that and the skin should automatically load onto your desktop.
Unloading Skins
If you don’t like how it looks and want to remove it, you’re going to have to unload it. There are two ways to unload a skin from your desktop. First, you could right-click on the skin and click unload skin.

When you click that the skin should be removed from your desktop. You can also open the Rainmeter menu, the one we located earlier, and unload the skin from there.

Every Rainmeter skin functions differently, so covering specifics of customization of a skin isn’t beneficial here as this is more of an overview of how to get skins on and off of your desktop. Some skins are as easy as downloading and double-clicking to open. Then you can just click and drag it to where you want. You can combine different skins as well. Some skins include many different parts, such as the one I downloaded in my example.

All of these things came included with the skin. Not all skins are like this. Some skins will only be a clock, a visualizer, etc.
The skin I downloaded came preset with this layout. It’s called the NXT-OS if you want a good skin that already has a lot of preset features. You can also download different parts, like a clock and a visualizer, separately as I did on my second display.

Here is my second monitor with two different skins being combined to make a nice clock look.
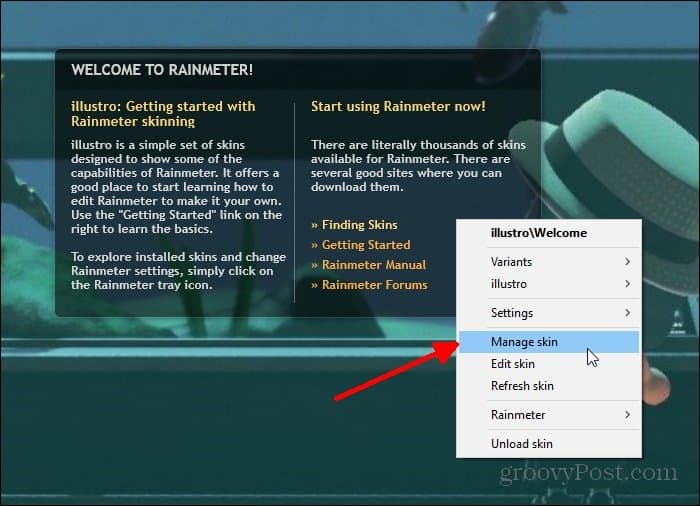
With these types of skins, to put them where you want all you need to do is click and hold, then drag the skin to the location on your desktop you want it to be in. Many skins will have a settings menu as well if they include multiple parts. For the NXT-OS skin, there’s a setup process you need to go through, and a welcome screen you can access at any time. Here’s what the welcome screen looks like.

Welcome menu
There’s also a settings menu to customize the different parts of the skin.

Settings menu
Summing Up
It all depends on what you find out there and how the developer set up their skin. The Rainmeter site provides a lot of resources for creating a nice looking desktop, and there’s a large community of people that use Rainmeter and create their own skins.
On the Rainmeter site, they provide a link to their forum where many people discuss questions/problems they have on Rainmeter. The best way to get the exact desktop you want is to dive into the community. I hope this article at least gave you a general idea of how to navigate Rainmeter and get it set up on your computer.