How to Edit Videos With the Photos App on iPhone

The Photos app in iOS 13 includes the ability to edit videos you take on your iPhone directly from the app. Here’s how to do it.
The Photos app on iOS has long supported the image-editing. Beginning with iOS 13, those editing tools have now been extended to video. Tools and effects like rotate, crop, auto-enhance, and others are also available on iPad with iPadOS 13. Let’s do this!
iOS 13 Video Editing: A Primer
If you see a photo-editing tool available for images in the native Photos app on your iPhone, the odds are high the same tool is available for videos. The functionality extends to all video formats supported by Apple’s mobile devices, including 4K at 60 fps and slo-mo in 1080p at 240 fps. The video format supported is limited to the device you’re using. The iPhone XR, iPhone 11, iPhone 11 Pro, and iPhone 11 Pro Max support 4K video recording at 24 fps, 30 fps, or 60 fps, 1080p HD video recording at 30 fps or 60 fps, Slo-mo video support for 1080p at 120 fps or 240 fps.
Video-editing tools are available in iOS 13/iPadOS 13 on the iPhone SE and later, iPod touch (7th generation only), and iPad Air 2 and later.
What You Can Do
In the following paragraphs, you’ll learn how to trim, resize, and flip/rotate a video. You can also see how to adjust the brightness, saturation, and other characteristics of your video, and more. All edits are performed in the Photos app, which is located on your device’s Home screen.
To find your videos and get them ready for editing:
- Choose Albums at the bottom of the app.
- Tap Videos under Media Types.
- Select the video to edit.
- Tap Edit at the top right.

Trimming Your Video
To trim a video in the Photos app, you must first activate the timeline directly below the video. The timeline features tiny images that make up your video. On either side of the timeline are anchors that signify the start and end of the video.
- Tap and hold either the left or right side of the timeline, which activates the trimming tool.
- Drag the anchor inward left or right to trim your video. To expand your video, tap and hold an anchor and move your finger outward.
- Tap Done at the bottom right when you’re done trimming your video.
- Choose Save Video or Save Video as New Clip. The former edits the existing clip, while the latter creates a new one while leaving the original intact.
The end of a video gets trimmed in the example below:

Resizing a Video
The resizing tools in the Photos app allow you to change how to present a video. You can choose from Straighten, Horizontal, and Vertical.
- On the video edit screen, tap the Crop icon at the bottom middle of the screen.
- With your finger, select from Straighten, Horizontal, or Vertical; each is represented by a circular icon in the bottom middle of the screen.
- Resize your video using your finger, as applicable.
- Tap Done to save your video.
The vertical size of the video is changed below:

Flipping and Rotating a Video
If you want to flip or rotate your video, Apple has you covered!
- On the video edit screen, tap the crop icon.
- Tap the flip icon at the top left.
- Choose the rotate icon at the top left to rotate the video.
- Tap Done when you’re finished.
In the following example, our video gets flips, then rotated:

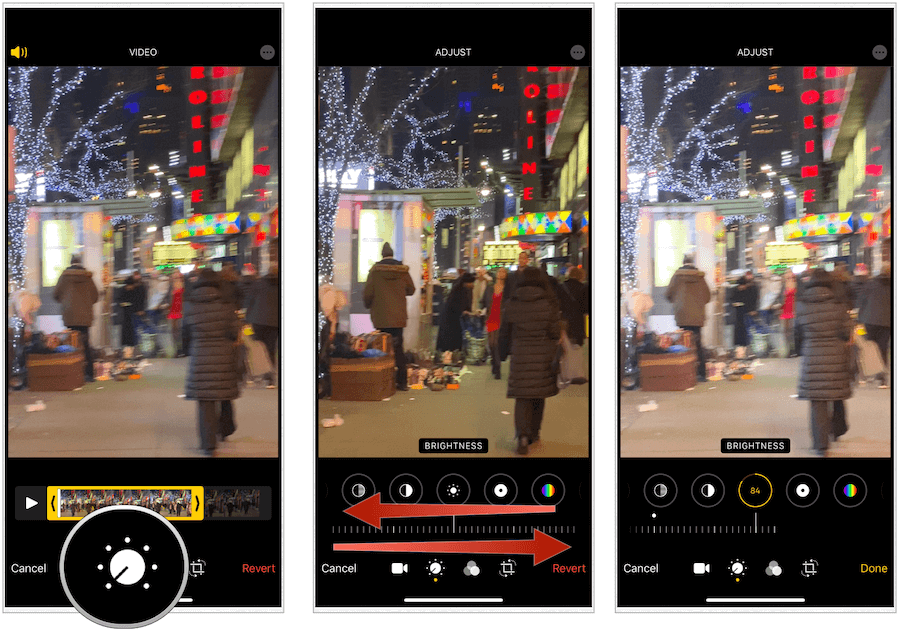
Adjusting Brightness of Your Video
Just as you can with images, you can adjust the brightness of your videos in the Photos app on your iPhone or iPad.
- On the video edit screen, choose the adjustment icon, which is located at the bottom middle of the screen.
- Choose the Brightness circle.
- Scroll left and right to change the brightness of your video.
- Tap Done.
Increased brightness has been added to the video below:
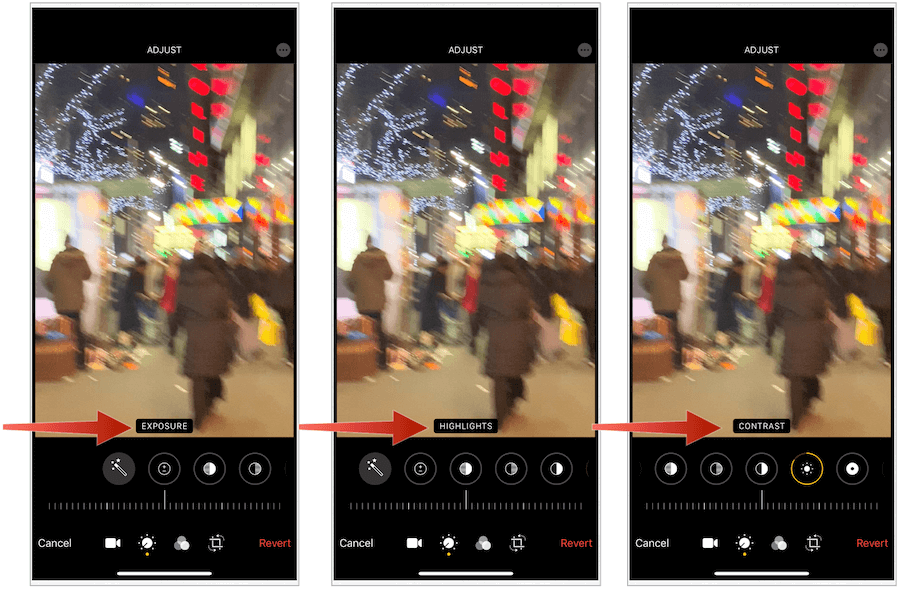
Other Possible Adjustments
Brightness isn’t the only adjustment you can make to videos in the Photos app in iOS 13. You can also change the exposure, highlights, shadows, contrast, black point, saturation, vibrancy, warmth, tint, sharpness, definition, noise reduction, and vignette. There’s also an auto-enhance option that, when selected, does multiple adjustments behind the scenes to create a stunning effect worth considering.
Each adjustment is found after tapping on the adjustment icon on the main video editing screen. Each is represented by an icon in the same section on the adjustment screen as brightness, as you can see in the examples below:
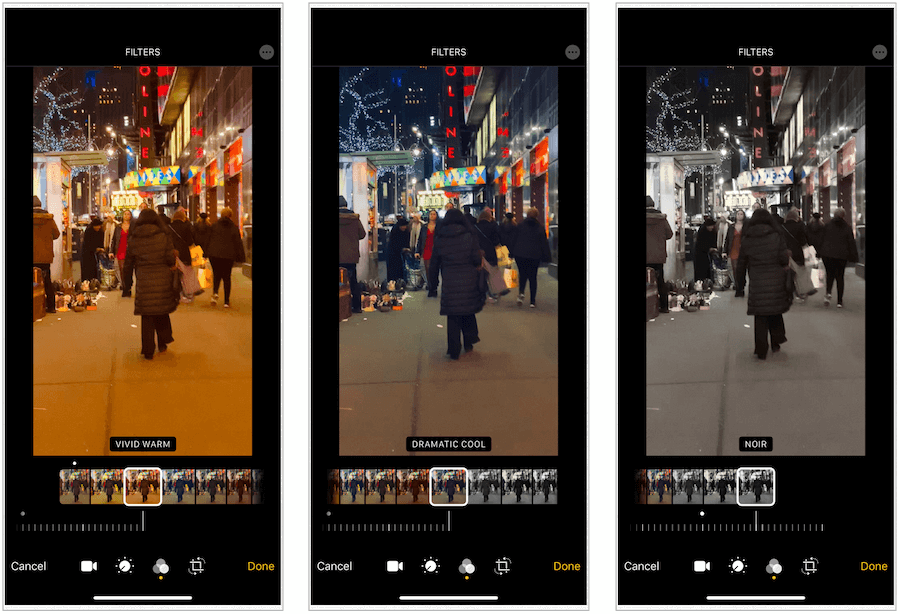
Adding Filters to Video
Using a filter on images has long been a popular choice for photographer’s post-processing. You can now add filters to videos too in the Photos app. There are currently 10 filters, including original, vivid, vivid warm, vivid cool dramatic, dramatic warm, dramatic cool, mono, silvertone, and noir.
- On the video edit screen, choose the filter icon at the bottom middle of the screen.
- Select from the filters. As you tap on a filter, you’ll see a preview.
- Scroll left and right to change the intensity of the filter.
- Choose Done.
Here’s a look at three filters: vivid warm, dramatic cool, and noir:
Muting the Sound
Video, unlike images, usually includes sounds. If you’d like to turn the sound on your video off, you can do so easily in the Photos app.
- On the video edit screen, tap the sound icon at the top left to turn it on/off.
- Choose Done.
Can You Remove Edits?
Edits made to videos (and images) in the Photos app are temporary if you want them to be. At any time, you can revert them to their original state.
To do so:
- On the video edit screen, tap Revert at the bottom right of the screen.
- Select Revert to Original to confirm.
Note: If you made numerous edits to your video, instead of reverting to the original form, you could go back to a previous edit. To do so, tap on the video. To go back further, tap the video again and so forth. The number of taps available is based on the number of edits you made. On the final tap, you’ll see the original format for the video.
Your video is now in its original format:

The Choice
The App Store offers lots of third-party video-editing solutions. Until now, using these was the only way you could edit videos on your iPhone or iPad. Not anymore. With iOS 13/iPadOS 13, you can use the same tools for image-editing for videos.
For professionals, these tools probably won’t be enough as many of the third-party apps offer advanced features so far missing from the native app. Nonetheless, Apple’s solution is free, and no doubt, future software versions will add more features and options, so stay tuned!


