10 Easy Tips for Taking the Best Pictures on iPhone

Taking photos with your iPhone is a straight-forward process. But if you want to step it up a notch, check out these easy tips for getting the most out of your shots.
Apple iPhone has become the most popular camera in the world and one that gets better with each new hardware and software release. Taking photos with an iPhone is a somewhat simple process. To move your iPhone photo-taking to a new level, consider these easy tips.
1. Use the Shortcut
Your iPhone’s lock screen has a Camera shortcut button that easily accessible. Use it to better guarantee that you can take the perfect shot at a moment’s notice. You can also swipe left to open the Camera app from the lock screen.
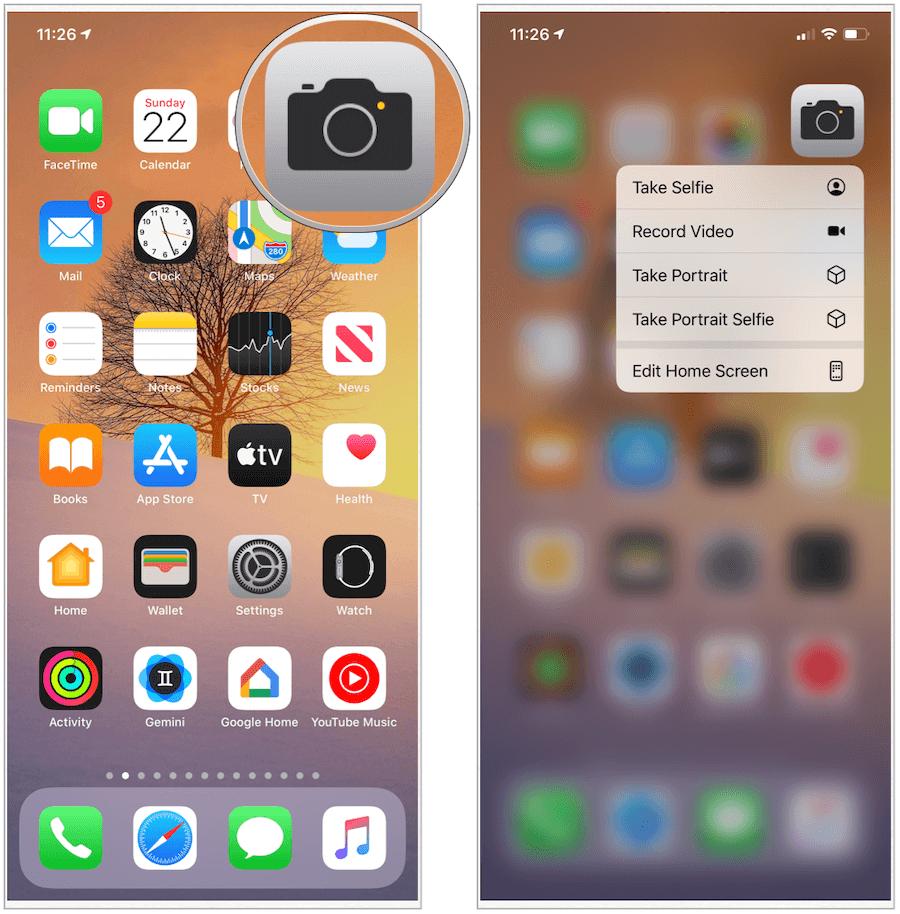
2. 3D Touch and Haptic Touch
Late-generation iPhones have either 3D Touch or Haptic Touch installed. Both provide shortcuts when you press hard on an app icon on your iPhone Home screen. The Camera app offers several shortcuts, including those for taking a selfie, recording video, taking a portrait, and taking a portrait selfie. Just tap on the shortcut you’d like to use to get started.
3. Remember the Volume Up Button
As iPhones get larger, the ability to push the shutter button from within the Camera app has gotten more difficult. No worries, however, since you can also use the Volume Up button on your iPhone to snap a photo. The Volume Up button on your connected earphones will also snap a photo, as will the Camera app on Apple Watch.
4. Set the Timer
The Camera app has long had a built-in timer to get you a little bit of time to prepare for the perfect shot. In iOS 13, you can set the time to three or 10 seconds. Once you push the timer button, you’ll see the numbers come up on the screen as it counts down.
5. Embrace Live Photos
First introduced on the iPhone 6s in 2015, Live Photos allows you to take images that come alive when you touch them. The images, which use the 1.5 seconds before and after a picture is taken with a supported device, capture both movement and sound. While many view Live Photos as gimmicky, at best, this isn’t the case. Since you take Live Photos just like you do traditional photos, you have nothing to lose by using the setting. During post-processing, you can choose to turn off Live Photos on specific images. In doing so, they will revert to regular images.

6. Take Advantage of Portrait Mode
Available on the iPhone 7 Plus and later, Portrait mode on your iPhone creates a brilliant depth-of-field effect on any photo. In doing so, you can compose a photo that keeps your subject sharp while also blurring the background. From there, you can add lighting effects to your image and also take a selfie in Portrait mode (with the iPhone X and later).
Perhaps the best part of the Portrait mode on the iPhone is you can adjust the level of background blur and the intensity of Portrait Lighting effects post-processing. To get started, be sure to select Portrait in the Camera app.
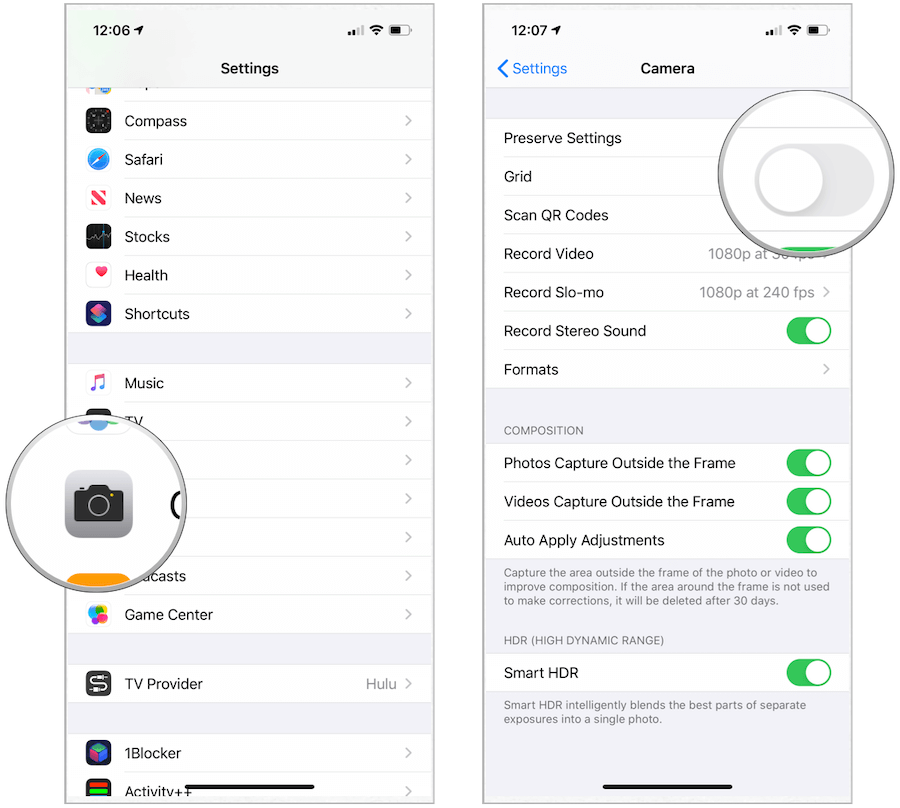
7. Experts Use the Rule of Thirds
Professionals often use the Rule of Thirds when taking photos. This tool involves mentally dividing your shot using two horizontal lines and two vertical lines. In doing so, you divide the most important elements of your scene along those lines. You can add a grid to the Camera app by visiting the Settings app on your iPhone. From there, tap Camera, and toggling on Grid.
8. Check Out Third-Party Apps
In recent years, Apple has added lots of great features to both the native Camera and Photos app on the iPhone. At the same time, there’s no denying the App Store has a long list of very good third-party camera apps worth taking for a spin. These apps bring different things to the table, including unique effects and filters, advanced editing tools, and more.
When selecting a third-party app, choose one that’s been well-received in the App Store and ideally, has been around for a long time. Be aware that many photos-related apps offer in-app purchases that unlock advanced features. These tend to get pricey, depending on the number of extras.
Among the third-party apps that come recommended include Camera+ 2, DSLR Camera, Hipstamatic X, and Snapseed.
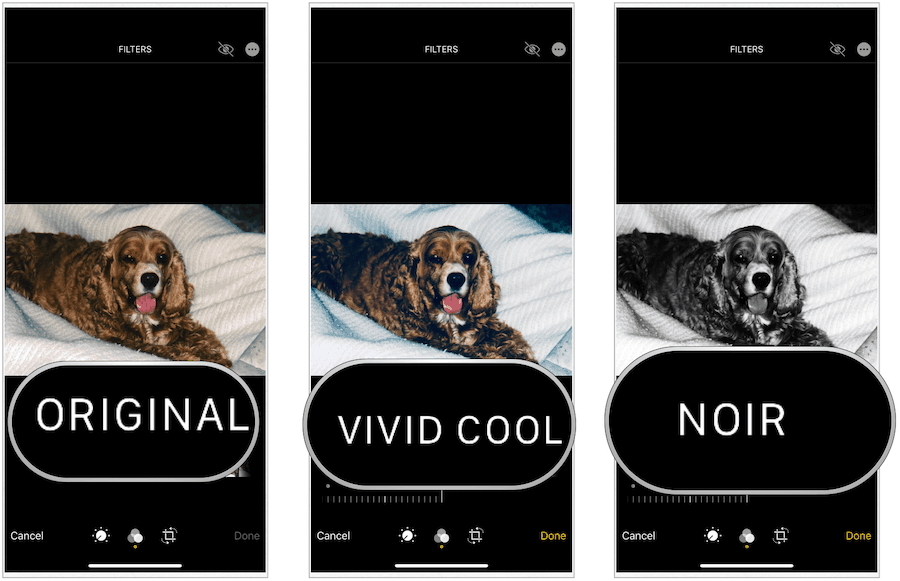
9. Learn to Use Filters
Creating the perfect image sometimes involves added filters and effects. You can use these tools during post-processing. To date, Apple offers 10 filters through the Photos app. To get started, click on a photo in the Photos app. From there, tap Edit at the top right and then select the Filter button. Next, choose your filter.
10. When in Doubt, Join the Academy
Many professional photographers will never view the iPhone and other smartphones as real cameras. Perhaps this was true years ago, but today’s smartphone cameras are better than ever thanks to rapidly improving hardware and expanded software tools. If you’re looking for further direction, considering a subscription to the iPhone Photography Academy, an online course where you can learn many more iPhoneography tips and tutorials.


